
TIL_220111_IOT
모터 회전(왼쪽 모터)
import RPi.GPIO as GPIO
import time

B_IA_pwm = 18
B_IB = 17

GPIO.setmode(GPIO.BCM)

GPIO.setup(B_IA_pwm, GPIO.OUT)
GPIO.setup(B_IB, GPIO.OUT)

pwm = GPIO.PWM(B_IA_pwm, 1000.0)
pwm.start(0.0)

try:
  while True:
    GPIO.output(B_IB, False)
    pwm.ChangeDutyCycle(0.0)
    time.sleep(1.0)
    GPIO.output(B_IB, True)
    pwm.ChangeDutyCycle(0.0)
    time.sleep(1.0)
    GPIO.output(B_IB, True)
    pwm.ChangeDutyCycle(100.0)
    time.sleep(1.0)
    GPIO.output(B_IB, False)
    pwm.ChangeDutyCycle(100.0)
    time.sleep(1.0)

except KeyboardInterrupt:
  pass

pwm.ChangeDutyCycle(0.0)
pwm.stop()
GPIO.cleanup()
모터 회전(오른쪽 모터)
import RPi.GPIO as GPIO
import time

A_IA_pwm = 19
A_IB = 16

GPIO.setmode(GPIO.BCM)
GPIO.setup(A_IA_pwm, GPIO.OUT)
GPIO.setup(A_IB, GPIO.OUT)

pwm = GPIO.PWM(A_IA_pwm, 1000)
pwm.start(0.0)

try:
  while True:
    GPIO.output(A_IB, False)
    pwm.ChangeDutyCycle(0.0)
    time.sleep(1.0)
    GPIO.output(A_IB, True)
    pwm.ChangeDutyCycle(0.0)
    time.sleep(1.0)
    GPIO.output(A_IB, True)
    pwm.ChangeDutyCycle(100.0)
    time.sleep(1.0)
    GPIO.output(A_IB, False)
    pwm.ChangeDutyCycle(100.0)
    time.sleep(1.0)

except KeyboardInterrupt:
  pass

pwm.ChangeDutyCycle(0.0)
pwm.stop()
GPIO.cleanup()
모터 회전(양쪽 모터)
import RPi.GPIO as GPIO
import time

B_IA_pwm = 18
B_IB = 17

GPIO.setmode(GPIO.BCM)
GPIO.setup(B_IA_pwm, GPIO.OUT)
GPIO.setup(B_IB, GPIO.OUT)

A_IA_pwm = 19
A_IB = 16

GPIO.setmode(GPIO.BCM)
GPIO.setup(A_IA_pwm, GPIO.OUT)
GPIO.setup(A_IB, GPIO.OUT)

pwmB = GPIO.PWM(B_IA_pwm, 1000.0)
pwmA = GPIO.PWM(A_IA_pwm, 1000.0)
pwmB.start(0.0)
pwmA.start(0.0)

try:
  while True:
    GPIO.output(B_IB, False)
    GPIO.output(A_IB, False)
    pwmB.ChangeDutyCycle(0.0)
    pwmA.ChangeDutyCycle(0.0)
    time.sleep(1.0)
    GPIO.output(B_IB, True)
    GPIO.output(A_IB, True)
    pwmB.ChangeDutyCycle(0.0)
    pwmA.ChangeDutyCycle(0.0)
    time.sleep(1.0)
    GPIO.output(B_IB, True)
    GPIO.output(A_IB, True)
    pwmB.ChangeDutyCycle(100.0)
    pwmA.ChangeDutyCycle(100.0)
    time.sleep(1.0)
    GPIO.output(B_IB, False)
    GPIO.output(A_IB, False)
    pwmB.ChangeDutyCycle(100.0)
    pwmA.ChangeDutyCycle(100.0)
    time.sleep(1.0)

except KeyboardInterrupt:
  pass

pwmB.ChangeDutyCycle(0.0)
pwmA.ChangeDutyCycle(0.0)
pwmB.stop()
pwmA.stop()
GPIO.cleanup()
응용
모터 키보드로 조종
양쪽 모터 연결
조건
A 누르면 전진
S 누르면 후진
D 누르면 정지
import RPi.GPIO as GPIO

B_IA_pwm = 18
B_IB = 17

GPIO.setmode(GPIO.BCM)
GPIO.setup(B_IA_pwm, GPIO.OUT)
GPIO.setup(B_IB, GPIO.OUT)

A_IA_pwm = 19
A_IB = 16

GPIO.setmode(GPIO.BCM)
GPIO.setup(A_IA_pwm, GPIO.OUT)
GPIO.setup(A_IB, GPIO.OUT)

pwmB = GPIO.PWM(B_IA_pwm, 1000.0)
pwmA = GPIO.PWM(A_IA_pwm, 1000.0)


try:
  while True:
    userInput = input()
    pwmB.start(0.0)
    pwmA.start(0.0)
    if userInput == 'a':
      GPIO.output(B_IB, True)
      GPIO.output(A_IB, True)
      pwmB.ChangeDutyCycle(0.0)
      pwmA.ChangeDutyCycle(0.0)

    if userInput == 's':
      GPIO.output(B_IB, False)
      GPIO.output(A_IB, False)
      pwmB.ChangeDutyCycle(100.0)
      pwmA.ChangeDutyCycle(100.0)

    if userInput == 'd':
      GPIO.output(B_IB, True)
      GPIO.output(A_IB, True)
      pwmB.ChangeDutyCycle(100.0)
      pwmA.ChangeDutyCycle(100.0)

except KeyboardInterrupt:
  pass

pwmB.stop()
pwmA.stop()
GPIO.cleanup()
보완 해야할 사항 : 코드를 실행하자마자 모터가 동작함
HM10 블루투스 디바이스
라즈베리파이의 Serial에 HM10 블루투스 디바이스 붙이기
Serial 모듈 활성화하기
sudo raspi-config


=> Would you like to reboot now? <Yes> 선택하여 재부팅
재부팅 후 아래 코드로 ttyS0 확인
ls -l /dev/ | grep serial
블루투스 통신 테스트
import serial

serialP = serial.Serial("/dev/ttyS0", baudrate=9600, timeout=3.0)
# ttyS0 파일 열기 / 시리얼 통신 속도 9600 / 입력 대기 시간 3초
# serialcmd="AT+ADDR?" 내 기기가 뭔지 찾기 위해
# serialP.write(serialcmd.encode())

try:
  while True:
    dat = serialP.read(1)
    # serialP가 가리키는 객체에 대해 read 함수를 호출해 1byte 데이터 기다림
    print(dat)

except KeyboardInterrupt:
  pass

serialP.close()
MCP3208 ADC 디바이스
SPI 버스에 MCP3208 ADC 디바이스 붙이기
ADC
Analog to Digital Converter
아날로그 신호(빛, 소리, 전압, 전류 등 연속적인 신호)를 디지털 숫자(0 or 1)로 변환
4단계(신호입력, 샘플링, 양자화, 복호화)

MCP3208 모듈
12비트 해상도
1111 1111 1111 = 십진수로 0~4095 값 => 0~3.3v 측정
0채널 ~ 7채널까지 총 8개 연결 가능
24비트를 보내면 24비트가 return 됨(응답은 12비트)
ADC 값 읽어보기
import spidev
import time

bus = 0
device = 0

spi = spidev.SpiDev()
spi.open(bus, device)
spi.max_speed_hz = 1000000

def analogRead(channel): # channel은 0
  buf = [(1>>2)|(1<<1)|(channel&4)>>2, (channel&3)<<6, 0]
  # << : 쉬프트, | : 더하기 or, & : 곱하기 and
  # 1: 0000 0001, 1<<2: 0000 0100(4), 1<<1: 0000 0010(2) => 4+2 = 6
  buf = spi.xfer(buf)
  adcValue = ((buf[1]&0xF)<<8)|buf[2]
  # 0xF : 비트마스크 처리
  return adcValue

try:
  while True:
    sensorInput = analogRead(0) # channel에 0이 들어감
    print(sensorInput)

except KeyboardInterrupt:
  pass

spi.close()
필기 보충

I2C 버스
PCA9685 모듈 쓰면 I2C로 PWM 제어가 가능함
LED 제어하기
import smbus
import pca9685
import time

led_pin = 11

i2c_bus = smbus.SMBus(1) # 1:/dev/i2c-1 (port I2C1)
pwm = pca9685.PWM(i2c_bus)

pwm.setFreq(1000)

try:
  while True:
    pwm.setDuty(led_pin, 0)
    time.sleep(0.5)
    pwm.setDuty(led_pin, 4095)
    time.sleep(0.5)

except KeyboardInterrupt:
  pass

pwm.setDuty(led_pin, 0)
i2c_bus.close()
LED 밝기 4095 단계로 조절해보기
import smbus
import pca9685
import time

led_pin = 11

i2c_bus = smbus.SMBus(1) # 1 :/dev/i2c-1 (port I2C1)
pwm = pca9685.PWM(i2c_bus)

pwm.setFreq(1000)

try:
  while True:
    for dutyCycle in range(0, 4096, 8):
      pwm.setDuty(led_pin, dutyCycle)
      time.sleep(0.001)
    for dutyCycle in range(4095, -1, -8):
      pwm.setDuty(led_pin, dutyCycle)
      time.sleep(0.001)

except KeyboardInterrupt:
  pass

pwm.setDuty(led_pin, 0)
i2c_bus.close()
응용
LED 키보드로 제어하기
조건
a 누르면 LED 켜짐s 누르면 LED 꺼짐d 누르면 점멸함
내 코드
import smbus
import pca9685
import time

led_pin = 11

i2c_bus = smbus.SMBus(1)
pwm = pca9685.PWM(i2c_bus)

pwm.setFreq(1000)

try:
  while True:
    userInput = input()
    if userInput == 'a':
      pwm.setDuty(led_pin, 4095)
    if userInput == 's':
      pwm.setDuty(led_pin, 0)
    if userInput == 'd':
     while True:
        pwm.setDuty(led_pin, 4095)
        print(1)
        time.sleep(0.5)
        pwm.setDuty(led_pin, 0)
        print(2)
        time.sleep(0.5)
        if userInput != 'd':
          # print('break')
          break

except KeyboardInterrupt:
  pass

pwm.setDuty(led_pin, 0)
i2c_bus.close()
문제점 : break가 안먹힘
강사님 코드
import smbus
import pca9685
import time
import threading
led_pin =11

i2c_bus = smbus.SMBus(1)
pwm = pca9685.PWM(i2c_bus)

pwm.setFreq(1000)

flag_exit = False
userInput ="f"
def blink_led():
  global userInput
  while True:
    if userInput == "a":
      pwm.setDuty(led_pin, 4095)
    elif userInput == "s":
      pwm.setDuty(led_pin, 0)
    elif userInput == "d":
      pwm.setDuty(led_pin, 4095)
      time.sleep(0.5)
      pwm.setDuty(led_pin, 0)
      time.sleep(0.5)
    else:
      pwm.setDuty(led_pin, 0)

    if flag_exit: break

tBL = threading.Thread(target=blink_led)
tBL.start()

try:
  while True:
    userInput = input() # for string
    print(userInput)

except KeyboardInterrupt:
  pass

tBL.join()
pwm.setDuty(led_pin,0)
i2c_bus.close()
: 쓰레드 이용
부저 제어하기
import smbus
import pca9685
import time

buzzer_pin = 11

i2c_bus = smbus.SMBus(1)
pwm = pca9685.PWM(i2c_bus)

pwm.setDuty(buzzer_pin, 2047)

try:
  for cnt in range(3):
    pwm.setFreq(262)
    time.sleep(1.0)
    pwm.setFreq(294)
    time.sleep(1.0)

except KeyboardInterrupt:
  pass

pwm.setDuty(buzzer_pin, 0)
i2c_bus.close()
부저 멜로디 연주하기
import smbus
import pca9685
import time

buzzer_pin = 11
melody = [262, 294, 330, 349, 392, 440, 460, 523]

i2c_bus = smbus.SMBus(1)
pwm = pca9685.PWM(i2c_bus)

pwm.setDuty(buzzer_pin, 2047)

try:
  for note in range(8):
    pwm.setFreq(melody[note])
    time.sleep(0.5)

except KeyboardInterrupt:
  pass

pwm.setDuty(buzzer_pin, 0)
i2c_bus.close()
응용
부저 키보드로 제어하기
조건
입력받은 freq 값 대로 소리 내기
ex) 262 입력하면 262에 해당하는 소리
내 코드
import smbus
import pca9685
import time

buzzer_pin = 11
userInput = input()

i2c_bus = smbus.SMBus(1)
pwm = pca9685.PWM(i2c_bus)

pwm.setDuty(buzzer_pin, 2047)

try:
  while True:
    pwm.setFreq(int(userInput))
    pwm.setDuty(buzzer_pin, 2047)
    time.sleep(0.5)
    pwm.setDuty(buzzer_pin, 0)

except KeyboardInterrupt:
  pass

pwm.setDuty(buzzer_pin, 0)
i2c_bus.close()
문제점 : 다음 소리가 안남(duty 때문인듯)
다른 수강생분 코드
import smbus
import pca9685
import time

buzzer_pin = 11
# melody = [262, 294, 330, 349, 392, 440, 494, 523]


i2c_bus = smbus.SMBus(1)
pwm = pca9685.PWM(i2c_bus)

pwm.setDuty(buzzer_pin, 0)

try:
  while True:
    userInput = input()
    pwm.setFreq(int(userInput))
    pwm.setDuty(buzzer_pin, 2047)
    time.sleep(2.0)
    pwm.setDuty(buzzer_pin, 0)


except KeyboardInterrupt:
  pass

pwm.setDuty(buzzer_pin, 0)
i2c_bus.close()
: while문 처리 다름 setDuty를 2초 간격으로 켰다 껐다하여 결과적으로 키보드 입력값이 2초동안 소리남
리눅스 명령어 ps
프로세스 강제 종료
ps -ef : 현재 떠 있는 프로세스 확인
ps -ef | grep <이름>
: 원하는 이름만 찾음
kill -9 <아이디>
: 아이디로 프로세스 종료
pkill -9 <이름>
: 이름으로 프로세스 종료
라즈베리 파이에 opencv 설치
...하려고 하는데
문제 발생
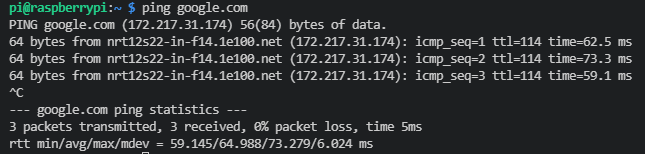
라즈베리파이가 인터넷에 연결이 안된다.
ping www.google.com
ping 8.8.8.8
핑 구글이랑 8.8.8.8 둘다 안된다.
ping 8.8.8.8은 100% packet loss가 뜬다.
기본 게이트웨이가 없는 것 같아 route로 게이트웨이를 검색해보니

이렇게 되어있었다.
인터넷 연결이 되는 사람과 비교해보니 내겐 없는 default 항목의 Gateway가 노트북명으로 설정되어 있었다.
일단 디폴트 게이트웨이를 192.168.138.1로 설정했다.
그리고 혹시 몰라 네트워크 연결 보기를 다시 한번 확인했다.

기억을 되살려 Wi-FI 속성에 들어가 ip를 할당하려 했더니


이렇게 뜨길래 아니요로 같은 주소로 설정했더니 노트북 IP도 먹통이 됐다.
네트워크 문제해결사로 다시 자동 할당으로 바꾸고나서 경고문을 찬찬히 보니까
Realtek PCle GbE Family Controller이 이더넷이었다...그래서 이더넷을 확인해봤다.


정답은 여기에 있었다. 137이 아니라 138로 되어야하는데 줄곧 137로 되어 있었다.
아마 아무것도 모를 때 초반에 설정을 ppt 그대로 했던 것 같다.
결론은...138로 바꾸니까 잘 됐다.
이것 때문에 수업 내내 찝찝했는데...비록 수업시간 내엔 진도 따라가느라 바빠서 집에 와서 해결했지만 어쨌든 뿌듯하다!
라즈베리 파이에 opencv 설치
sudo apt update
sudo apt install python3-opencv
VNC Viewer
모니터 없이 라즈베리 접근 가능

문제 발생
글자가 깨진다.

구글링해서 여길 참고했다.
sudo apt-get install fonts-unfonts-core
sudo apt-get install ibus ibus-hangul

이런식으로 글자는 깨지지만 설치는 된다.
설치 끝나면 reboot 해주면 된다.

OpenCV 이용
\opencv-4.x\data\haarcascades
haarcascade_eye.xml (눈 인식)
haarcascade_frontalface_default.xml (얼굴 정면 인식)
두 파일 이용
이미지 얼굴 캡쳐
\220111\opencv\image_269p.py
import cv2

img = cv2.imread('photo.jpg')
gray = cv2.cvtColor(img, cv2.COLOR_BGR2GRAY)

face_cascade = cv2.CascadeClassifier('haarcascade_frontalface_default.xml')
faces = face_cascade.detectMultiScale(gray, 1.3, 5)
for (x, y, w, h) in faces:
  img = cv2.rectangle(img,(x,y),(x+w, y+h),(255,0,0),2)

cv2.imshow('photo', img)
cv2.waitKey(0)
cv2.destroyAllWindows()

라즈베리파이 카메라 활성화

그리고 재부팅을 묻는 창이 뜨면 재부팅하면 된다.
카메라 - 실행
\220111\opencv\camera_278p.py
import cv2

cap = cv2.VideoCapture(0)
if cap.isOpened():
  print('width:', cap.get(cv2.CAP_PROP_FRAME_WIDTH))
  print('height:', cap.get(cv2.CAP_PROP_FRAME_HEIGHT))
  print('fps:', cap.get(cv2.CAP_PROP_FPS))

while cap.isOpened():
  ret, img = cap.read()

  if ret:
    cv2.imshow('Video Capture', img)

    key = cv2.waitKey(1) &0xFF # 1ms wait
    if key == 27: # ESC
      break

cap.release()
cv2.destroyAllWindows()
카메라 - 얼굴인식
\220111\opencv\face_recog_282.py
import cv2

face_cascade = cv2.CascadeClassifier('haarcascade_frontalface_default.xml')

cap = cv2.VideoCapture(0)

while cap.isOpened():
  ret, img = cap.read()

  if ret:
    gray = cv2.cvtColor(img, cv2.COLOR_BGR2GRAY)
    faces = face_cascade.detectMultiScale(gray, 1.3, 5)
    for (x,y,w,h) in faces:
      img = cv2.rectangle(img,(x,y),(x+w,y+h),(255,0,0),2)

  cv2.imshow('Video Capture', img)

  key = cv2.waitKey(1) &0xFF
  if key == 27:
    break

cap.release()
cv2.destroyAllWindows()
응용
얼굴 인식 캡쳐
조건
키보드 입력(k) 받으면 캡쳐
얼굴 인식 되어도 캡처 이미지 저장
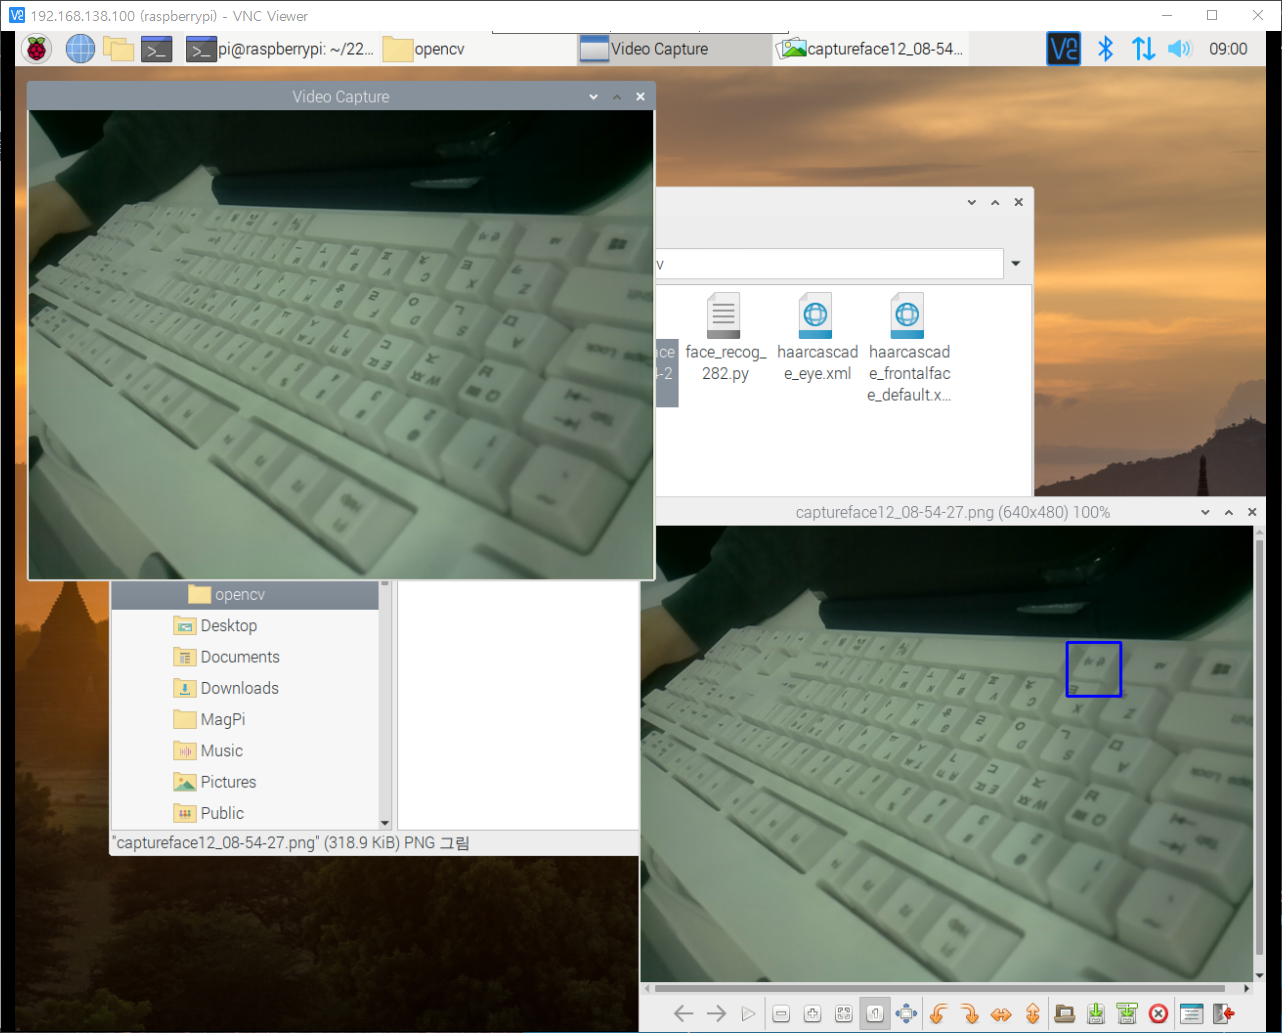
내 코드
\220111\opencv\face_recog_282.py
import cv2
import datetime

face_cascade = cv2.CascadeClassifier('haarcascade_frontalface_default.xml')

cap = cv2.VideoCapture(0)

now = datetime.datetime.now().strftime("%d_%H-%M-%S")

while cap.isOpened():
  ret, img = cap.read()

  if ret:
    gray = cv2.cvtColor(img, cv2.COLOR_BGR2GRAY)
    faces = face_cascade.detectMultiScale(gray, 1.3, 5)
    for (x,y,w,h) in faces:
      img = cv2.rectangle(img,(x,y),(x+w,y+h),(255,0,0),2)
      cv2.imwrite("captureface"+ str(now)+".png", img) # 얼굴 인식 될 때마다 캡쳐

  cv2.imshow('Video Capture', img)

  key = cv2.waitKey(1) &0xFF
  if key == 27:
    break
  elif key == ord('k'):
    print("캡쳐")
    cv2.imwrite("capture"+ str(now)+".png", img) # k 누르면 캡쳐

cap.release()
cv2.destroyAllWindows()
다른 수강생분 코드
import cv2

face_cascade = cv2.CascadeClassifier('haarcascade_frontalface_default.xml')

cap = cv2.VideoCapture(0)

count = 0

def captureImg(img):
  global count
  cv2.imwrite('output' + str(count) + '.png', img)
  count = count + 1

while cap.isOpened():
  ret, img = cap.read()

  if ret:
    gray = cv2.cvtColor(img, cv2.COLOR_BGR2GRAY)
    faces = face_cascade.detectMultiScale(gray, 1.3, 5)
    for(x, y, w, h) in faces:
      img = cv2.rectangle(img, (x, y), (x + w,y + h), (255, 0, 0), 2)

      captureImg(img)

    cv2.imshow('Video Capture', img)

    key = cv2.waitKey(1) &0xFF

    if key == 27:
      break
    elif key == ord('k'):
      captureImg(img)


cap.release()
cv2.destroyAllWindows()
: 함수 처리, count += 1을 넣으면 이미지가 덮어쓰기 되지 않고 인식 될 때마다 찍힌다.
느낀 점
라즈베리파이 인터넷이 안될 땐 정말 당황스러웠는데 수업 끝나고 계속 매달려서 결국 집에서라도 해결하니까 속이 시원하다.
확실히 매달린다고 무조건 좋은게 아닌 것이, 매달리면 매달릴수록 시야가 좁아져버린다.
이래서 짝코딩, 코딩하고 시간 정해 휴식이 필요한가보다.