
어제에 이어서 Flappy Bird 만들기
Button 만들기

빈 게임 오브젝트 만들어서 화면 채우기
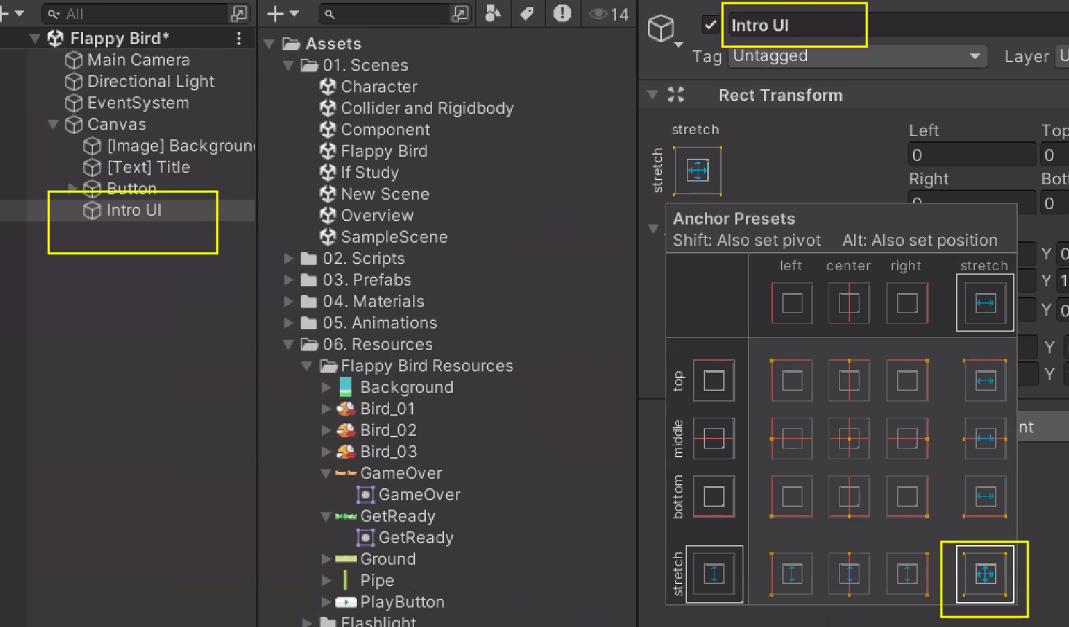
UI를 묶어주기

Button 누르면 화면 꺼지도록 OnClick()에 Intro UI / GameObject - SetActive 설정

결과물
GameView 화면

버튼 클릭 시 Canvas의 Intro UI가 잘 사라지는 모습(Active = false)

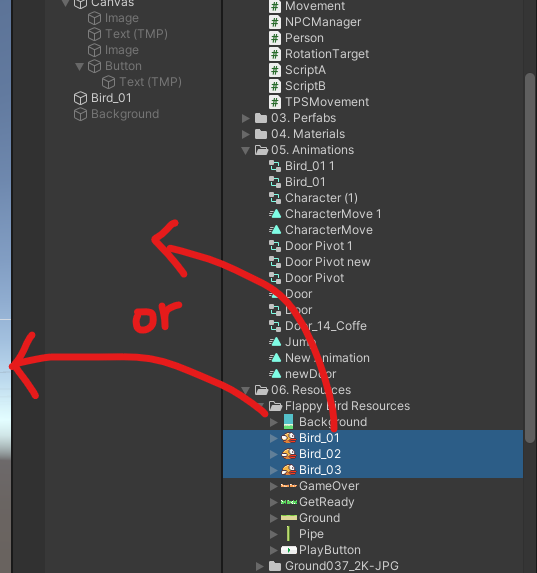
2D 이미지로 Animation 생성
Animation으로 만들 이미지 선택 후 drag&drop
2D 게임을 위한 원근감 없는 카메라로 변경

배경 이미지 복제
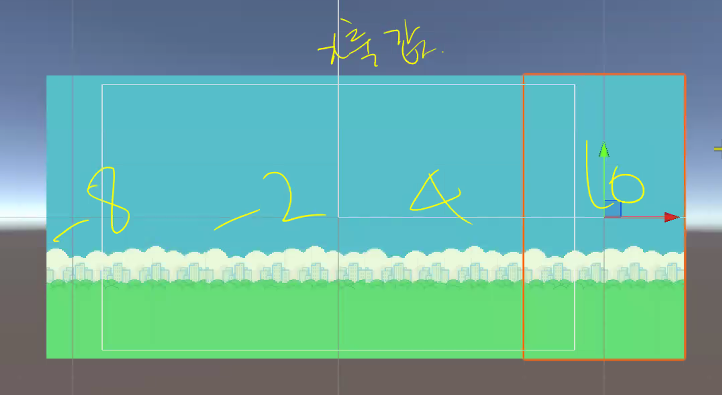
Order in Layer
새의 Order in Layer를 1로 바꿔주면 배경 이미지에 가려져있던 게 보임
-1, 0, 1, 2 ~ <- 이런 순서

무한맵(맵 반복)
새가 앞으로 가는 것처럼 무한맵 만들기
1. 지나간 이미지 재사용 : 이미 지나간 이미지를 다시 뒤로 배치
2. Material 수정 : Offset 수정
스크립트 작성
int, float, bool, string 등은 이미 초기값이 있어서 private으로 생성할 때 초기화 안해줘도 됨
하지만 아래처럼 유니티 상에서 None으로 할당해줘야할 땐 초기화 필요
    private SpriteRenderer sp;

        void Start()
    {
        sp = GetComponent<SpriteRenderer>(); // 할당
    }
offset 변경
// LoopMap.cs

using System.Collections;
using System.Collections.Generic;
using UnityEngine;

public class LoopMap : MonoBehaviour
{
    private SpriteRenderer sp;
    public float offsetSpeed = 0.5f;

    void Start()
    {
        sp = GetComponent<SpriteRenderer>();
    }

    void Update()
    {
        float offsetVal = offsetSpeed * Time.deltaTime;
        sp.material.SetTextureOffset("_MainTex", sp.material.mainTextureOffset + new Vector2(offsetVal, 0f));
    }
}
아래 값을 바꾸려고 하는것을 알 수 있음
근데 이건 유니티에서 기본으로 생성한 Default라 못바꿈
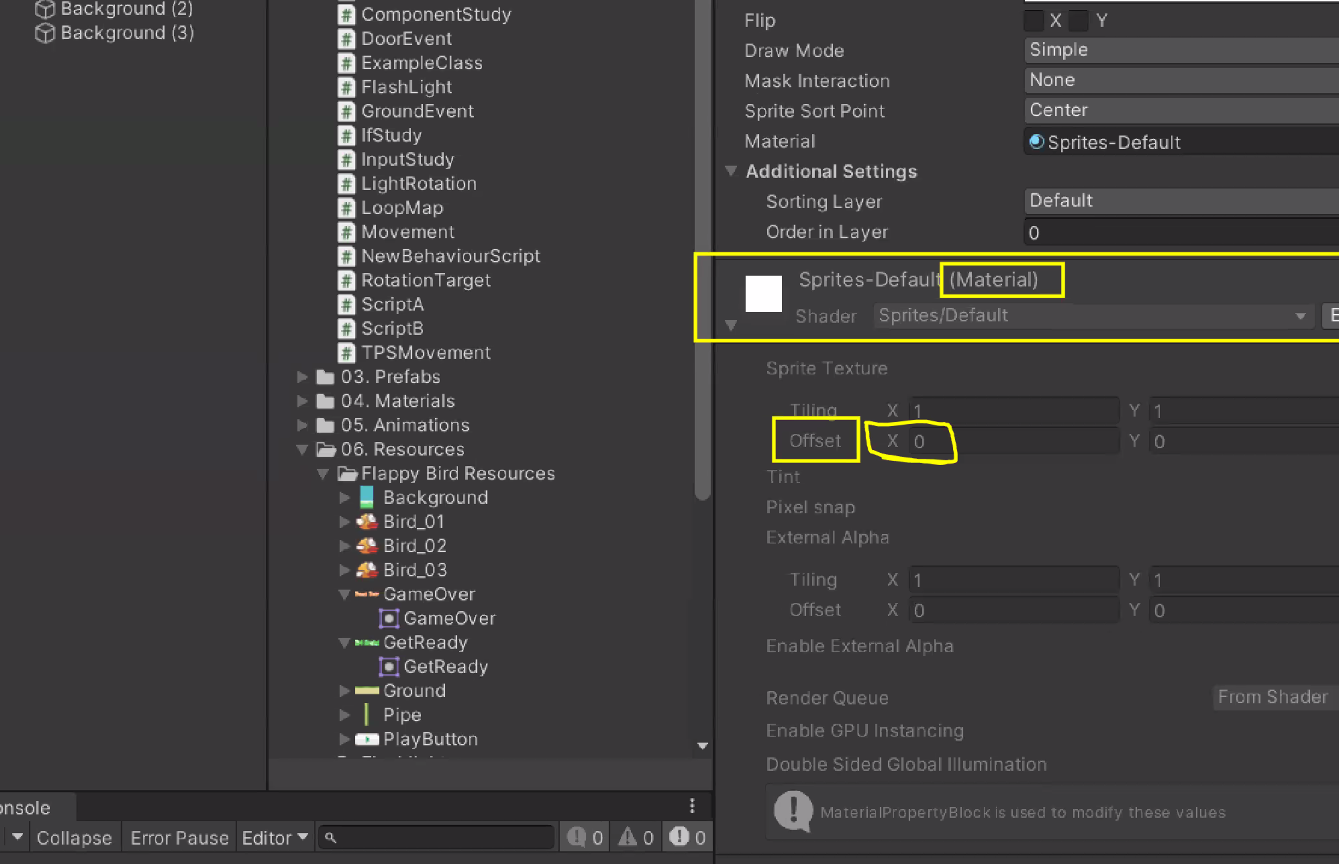
새로운 Material 생성
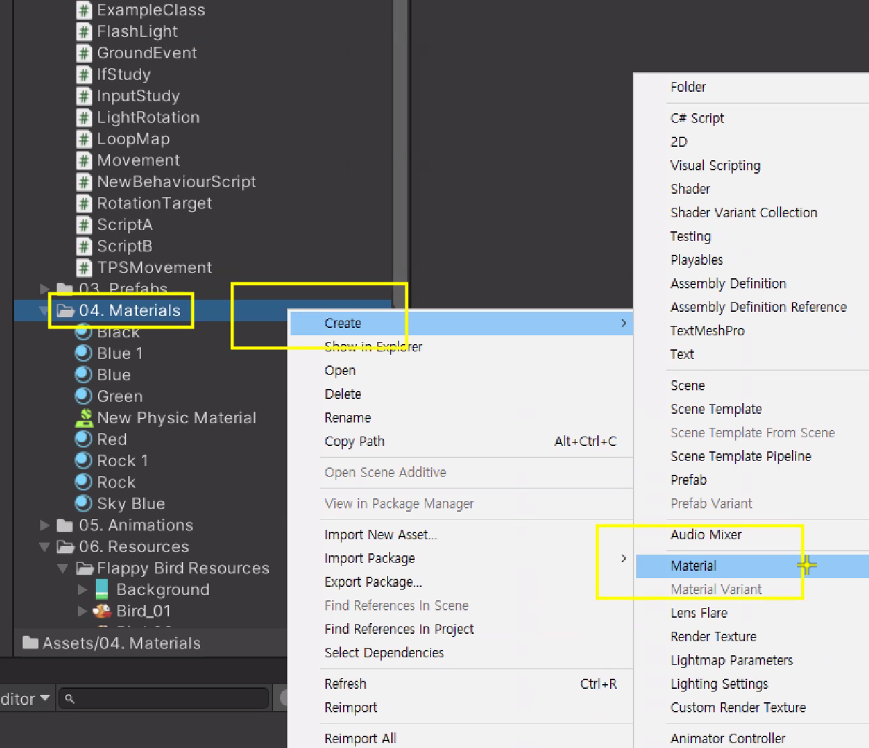
Shader 수정
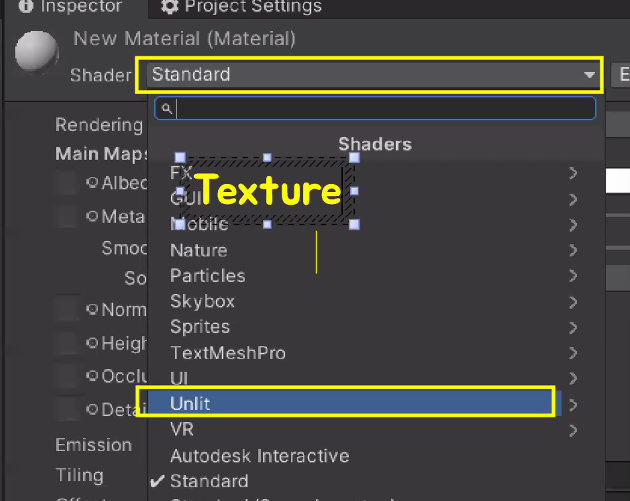
Material에 배경 이미지 할당

배경 이미지 1234에 방금 만든 Material 할당
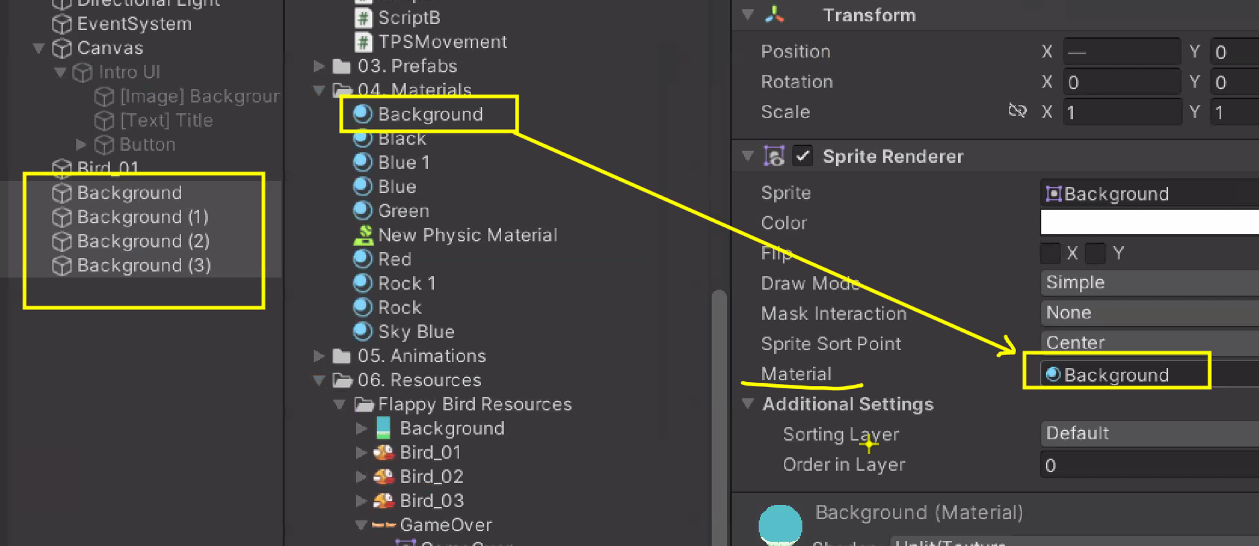
LoopMap 스크립트 할당

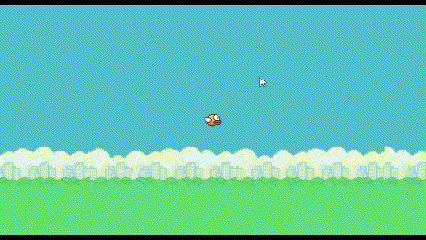
결과물
배경이 움직이는 것을 확인 가능
Bird 01에 Rigidbody 2D 넣기
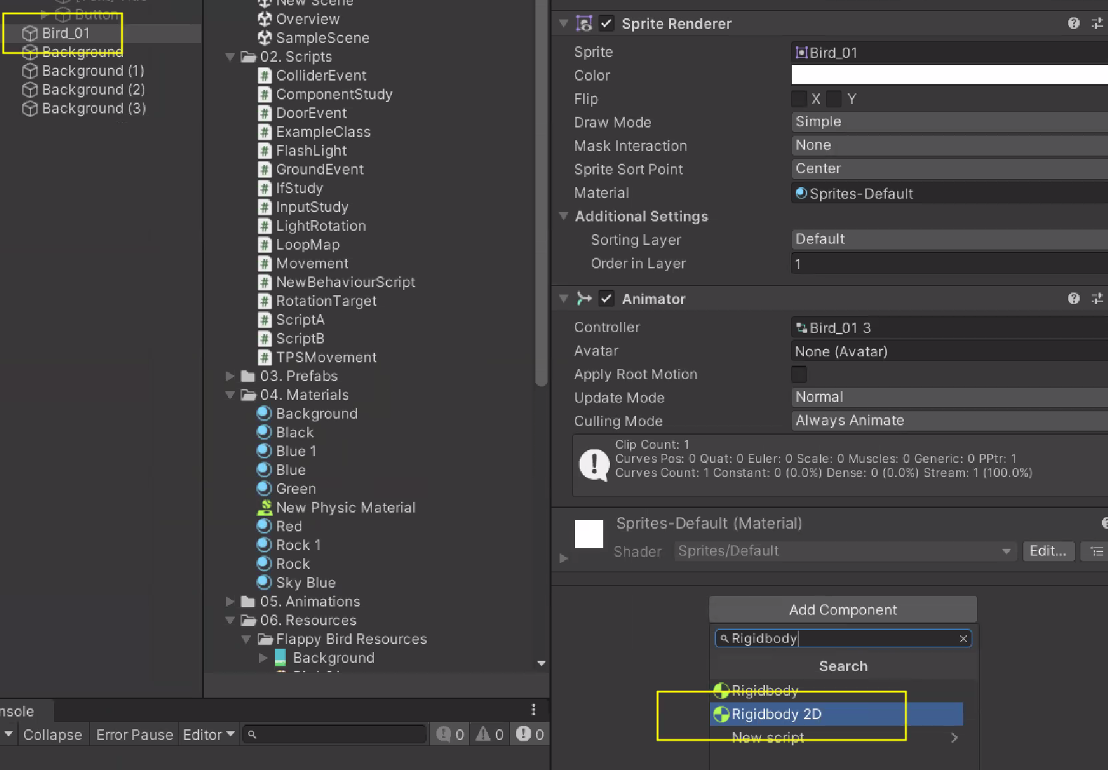
이제 새가 떨어짐
새가 스페이스바 눌렀을 때 위로 날아오르는 기능(점프 기능) 제작
스크립트 생성
// BirdMovement.cs

using System.Collections;
using System.Collections.Generic;
using UnityEngine;

public class BirdMovement : MonoBehaviour
{
    private Rigidbody2D myRigid;
    public float flyPower = 10f;

    void Start()
    {
        myRigid = GetComponent<Rigidbody2D>(); // 자기 자신의 Rigidbody2D를 할당
    }

    /// 키보드 스페이스바를 눌러서
    /// 새가 날아오르는 기능
    void Update()
    {
        if (Input.GetKeyDown(KeyCode.Space)) // 스페이스바 눌렀을 때
        {
            myRigid.AddForce(Vector2.up * flyPower, ForceMode2D.Impulse); // 위쪽으로 힘을 가함
        }
    }
}
Bird에 스크립트 적용

결과물
스페이스바 연타하면 엄청 멀리감ㅋㅋ달로 떠난 Flappy Bird ver.
힘 Force는 속도 velocity에 영향을 주기 때문에 속도 제한 limit velocity이 필요

스크립트 수정
속도 제한은 위쪽으로 힘을 가한 다음에 해야함
using System.Collections;
using System.Collections.Generic;
using UnityEngine;

public class BirdMovement : MonoBehaviour
{
    private Rigidbody2D myRigid;
    public float flyPower = 10f;
    public float limitPower = 5f;

    void Start()
    {
        myRigid = GetComponent<Rigidbody2D>(); // 자기 자신의 Rigidbody2D를 할당
    }

    /// 키보드 스페이스바를 눌러서
    /// 새가 날아오르는 기능
    void Update()
    {
        if (Input.GetKeyDown(KeyCode.Space))
        {
            myRigid.AddForce(Vector2.up * flyPower, ForceMode2D.Impulse);

            // 속도 체크 및 제한
            if (myRigid.velocity.y > limitPower) // 새의 y축 속도가 제한 속도보다 커졌을 때
            {
                // 속도 재조정
                myRigid.velocity = new Vector2(myRigid.velocity.x, limitPower);
            }
        }
    }
}
결과물
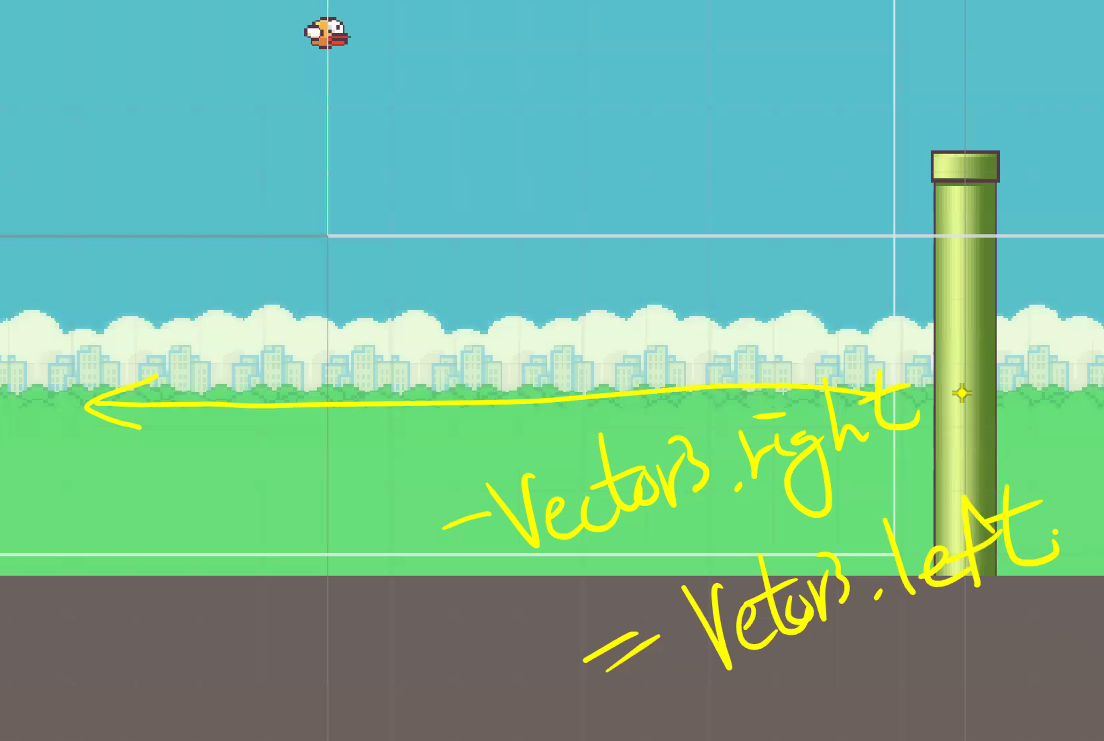
파이프 생성
pipe 넣고

스크립트 생성
pipe(GameObject)의 transform의 position이 3차원이라 Vector3 반영
// RandomPipeMap.cs

using System.Collections;
using System.Collections.Generic;
using UnityEngine;

public class RandomPipeMap : MonoBehaviour
{
    public GameObject pipe;
    public float pipeSpeed = 10f;

    void Update()
    {
        //pipe.transform.position = pipe.transform.position - Vector3.right * pipeSpeed * Time.deltaTime;
        pipe.transform.position -= Vector3.right * pipeSpeed * Time.deltaTime;
    }
}
-Vector3.right = Vector3.left
스크립트 할당

결과물
파이프가 잘 지나감
아직 파이프랑 충돌 이벤트는 없지만...한번 피해봄
파이프에 닿으면 게임 오버
이번엔 감지로 구현

스크립트 작성
OnTriggerEnter2D : Rigidbody2D, Collider2D에만 작동
using System.Collections;
using System.Collections.Generic;
using UnityEngine;
public class PipeEvent : MonoBehaviour
{
public void OnTriggerEnter2D(Collider2D collision)
{
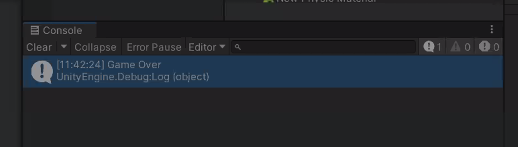
if (collision.CompareTag("Player"))
{
Debug.Log("GameOver");
}
}
}
태그 설정

이제 Bird와 Pipe에 각각 Collider2D 필요

Circle Collider 2D : 2D에서 가장 최적화 된 콜라이더
3D에선 Box Collider가 가장 최적화 된 콜라이더

Bird에 Circle Collider 2D
Pipe에 Box Collider 2D 각각 넣기
Pipe에는 감지 이벤트를 위해 isTrigger까지 체크


로그 확인 가능
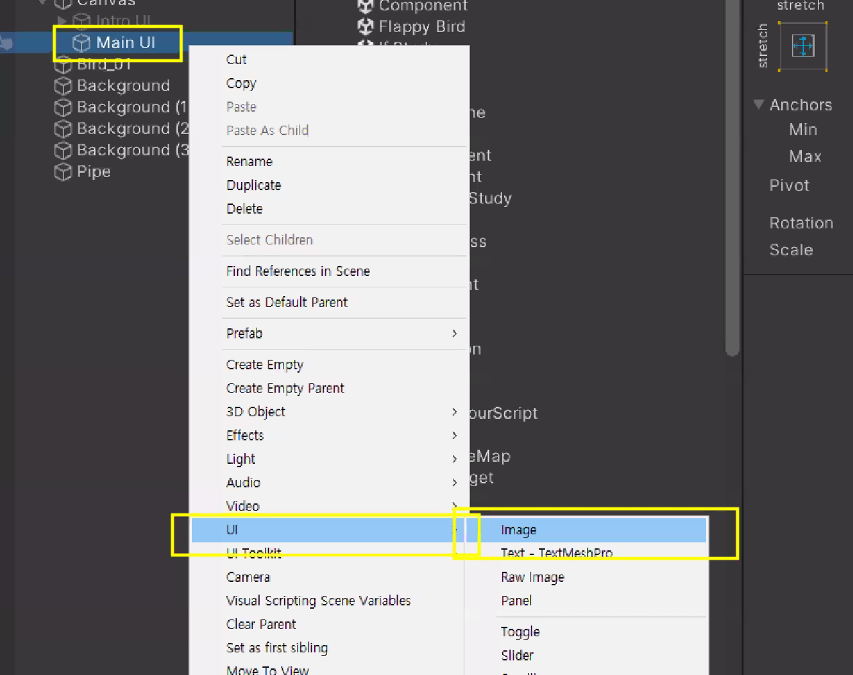
Game over 화면 구현

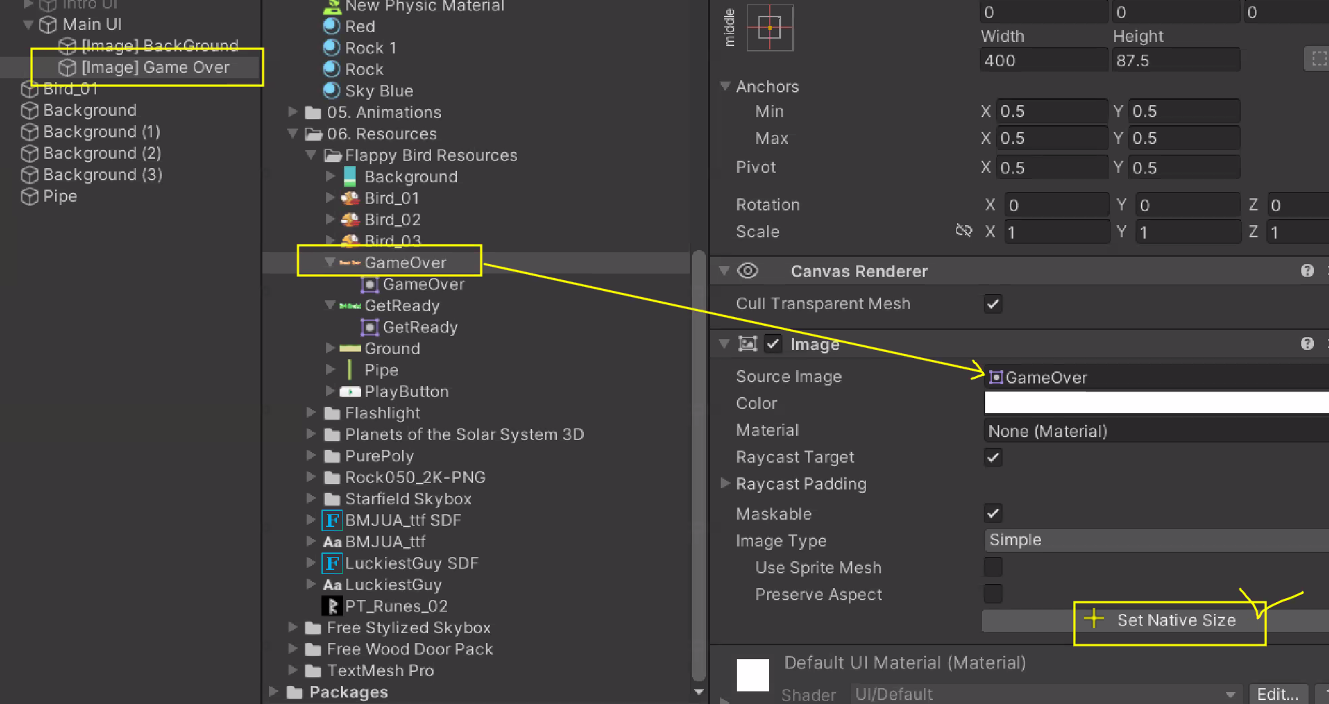
Image UI object 생성
배경 만들기
화면 꽉 채우고
불투명도 0, 검정색(0, 0, 0, 0)으로 변경

Game Over 이미지 넣기
Main UI에 애니메이션 생성

60 프레임에 불투명도 255로 조절
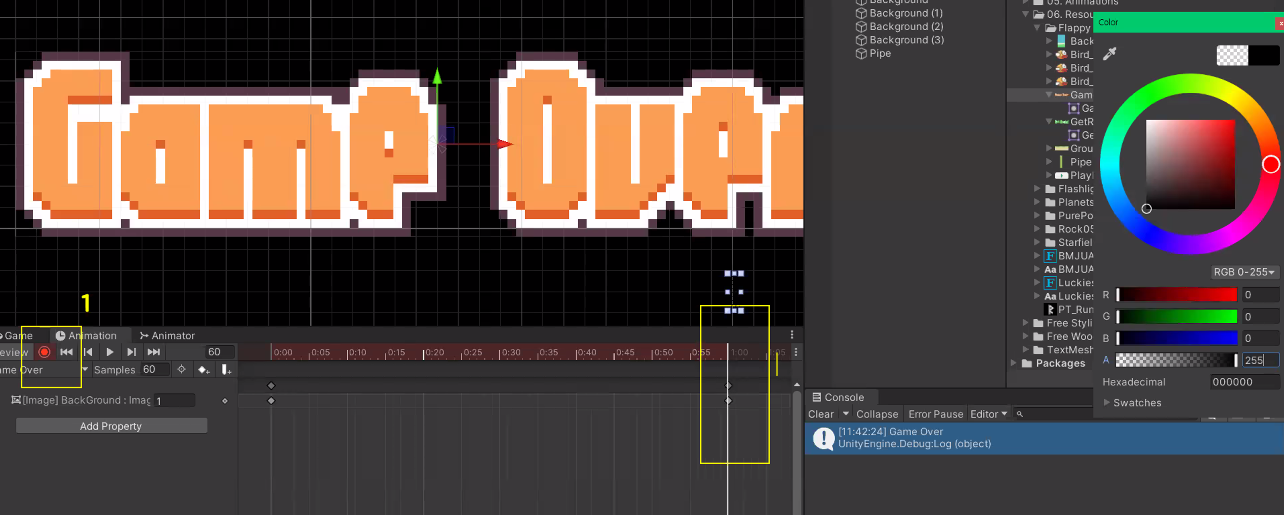
글자 팝업 애니메이션
Scale 0 -> 2
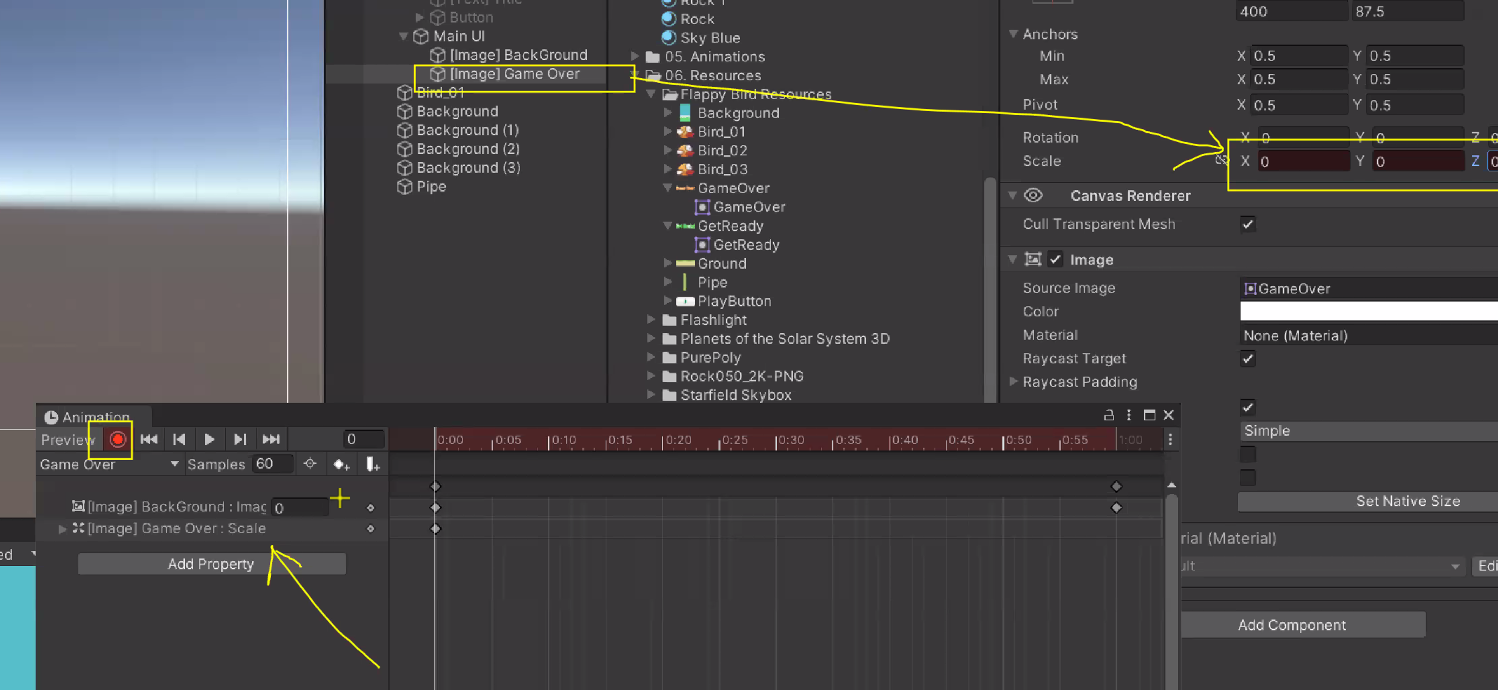
현재 상태

애니메이션 수정
먼저 fade in 되고나서 GameOver 문구 팝업

루프 끄기

스크립트 수정
// PipeEvent.cs

using System.Collections;
using System.Collections.Generic;
using UnityEngine;

public class PipeEvent : MonoBehaviour
{
    public GameObject endUI;
    public void OnTriggerEnter2D(Collider2D collision)
    {
        if (collision.CompareTag("Player"))
        {
            endUI.SetActive(true); // 종료 UI가 켜지는 기능

            Debug.Log("GameOver");
        }
    }
}
End UI로 이름 바꾼 Main UI 할당 및 Active false로 해두기
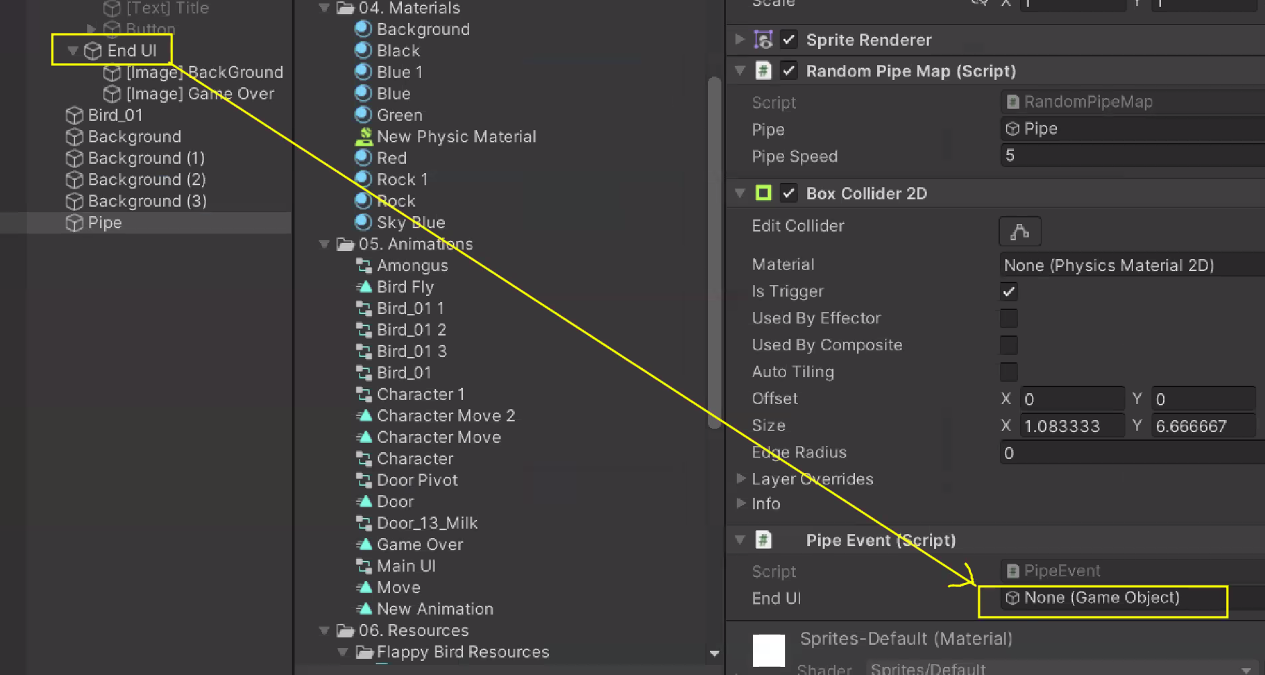
이제 부딪히면 GameOver 잘 뜸
Main이라는 Empty GameObject 만들어서 UI 제외한 object들 그룹화

Game Start 버튼 누르면 게임이 실행되도록 수정
-> 버튼 누르면 main의 active = true

결과물
게임 시작 버튼 눌러야 시작 완료
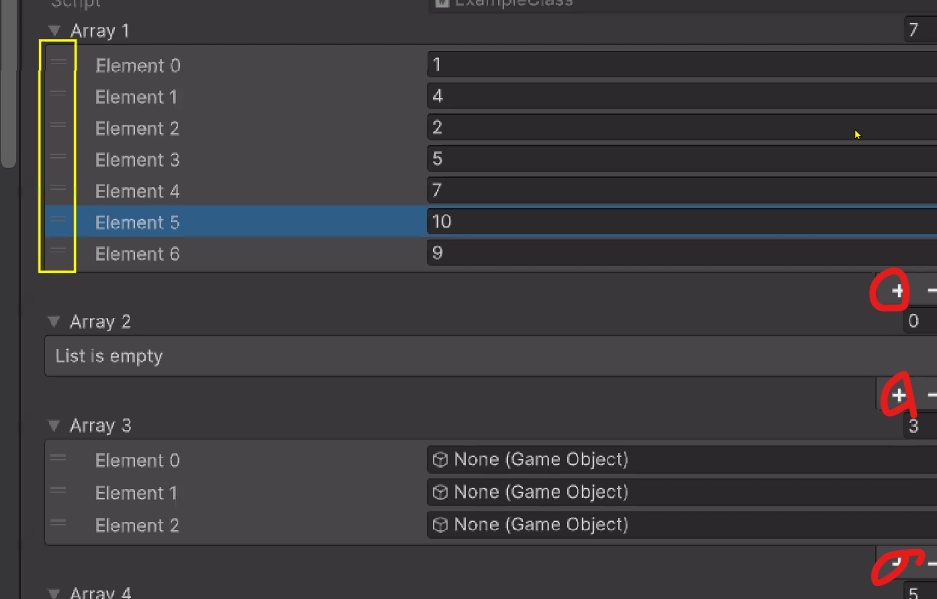
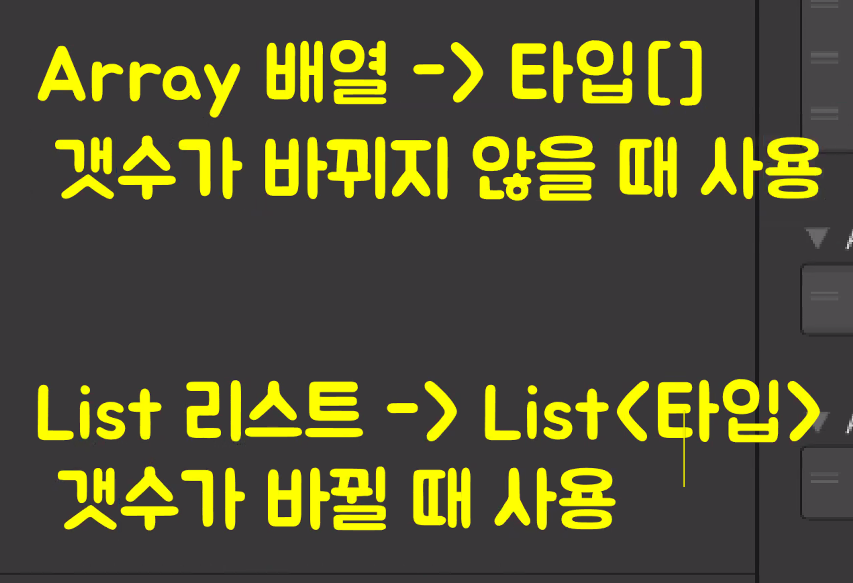
배열
Array
공간 추가, 삭제 불가능 ex. 아파트 = 속도 빠름

    public int[] intArr = {  1, 2, 3, 4, 5 };
    public float[] floatArr; // 유니티 에디터 상에서 할당 필요
    public GameObject[] gameObjArr = new GameObject[3]; // 요소 수가 3인 GameObject 배열 생성
유니티 에디터 상에서 확인 가능

List
Array와 다르게 공간 추가, 삭제 가능 = 속도 느림
linked list

Unity에서는 list가 동적 Array임
= 수정이 가능한 Array(약 2배정도 공간을 더 할당해서 추가 가능)
= ArrayList
    public List<int> intList = new List<int> { 1, 2, 3, 4, 5 };
    public List<float> floatList;
    public List<GameObject> gameObjList = new List<GameObject>();
유니티 에디터에서 확인 가능

유니티 에디터에서 Array도 수정 기능 지원함
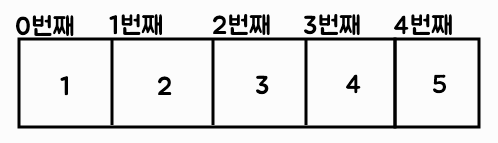
인덱서 Indexer
public class ExampleClass : MonoBehaviour
{
    public int[] array1 = { 1, 2, 3, 4, 5 };
    public float[] array2 = { 1.0f, 5.5f, -15f };
    public int[] array3 = new int[7];

    public List<int> list1 = new List<int> { 1, 2, 3, 4, 5 };
    public List<float> list2 = new List<float> { 1.0f, 5.5f, -15f };

    void Start()
    {
        Debug.Log(array1[0]);
        Debug.Log(array2[1]);
        Debug.Log(array2[7]); // 에러 발생

        Debug.Log(list1[1]);
        Debug.Log(list2[2]);
    }
}
파이프 랜덤 생성
파이프 적절하게 배치
위에 있는 파이프는 Flip으로 뒤집기


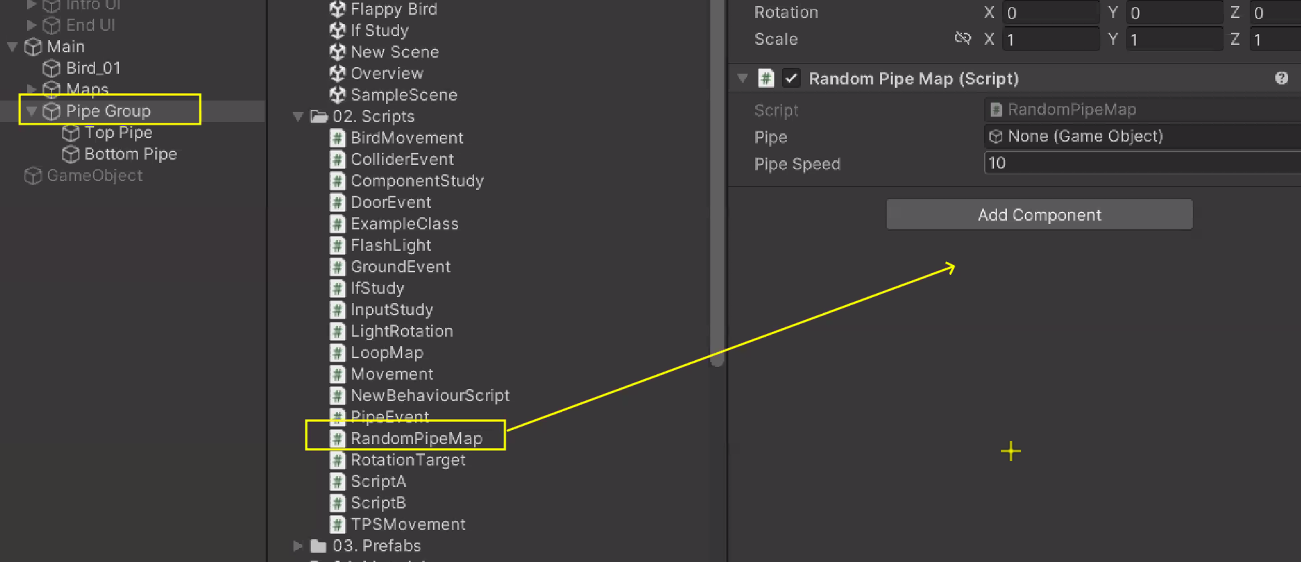
빈게임오브젝트 'Pipe Group' 생성하여 pipe들 그룹화

RandomPipeMap Script Pipe Group에 넣어주기
using System.Collections;
using System.Collections.Generic;
using UnityEngine;

public class RandomPipeMap : MonoBehaviour
{
    public GameObject[] pipes;
    public float pipeSpeed = 10f;

    void Update()
    {
        pipes[0].transform.position -= Vector3.right * pipeSpeed * Time.deltaTime;
        pipes[1].transform.position -= Vector3.right * pipeSpeed * Time.deltaTime;
    }
}
Top, Bottom Pipe 할당

파이프는 위, 아래도 랜덤하게 생성해야 함
=> enum 사용
    public enum PIPE_TYPE { TOP, BOTTOM, ALL }
    public PIPE_TYPE pipeType;


랜덤은 같은 타입만 넣을 수 있음
Random.Range(int, int)
Random.Range(float, float)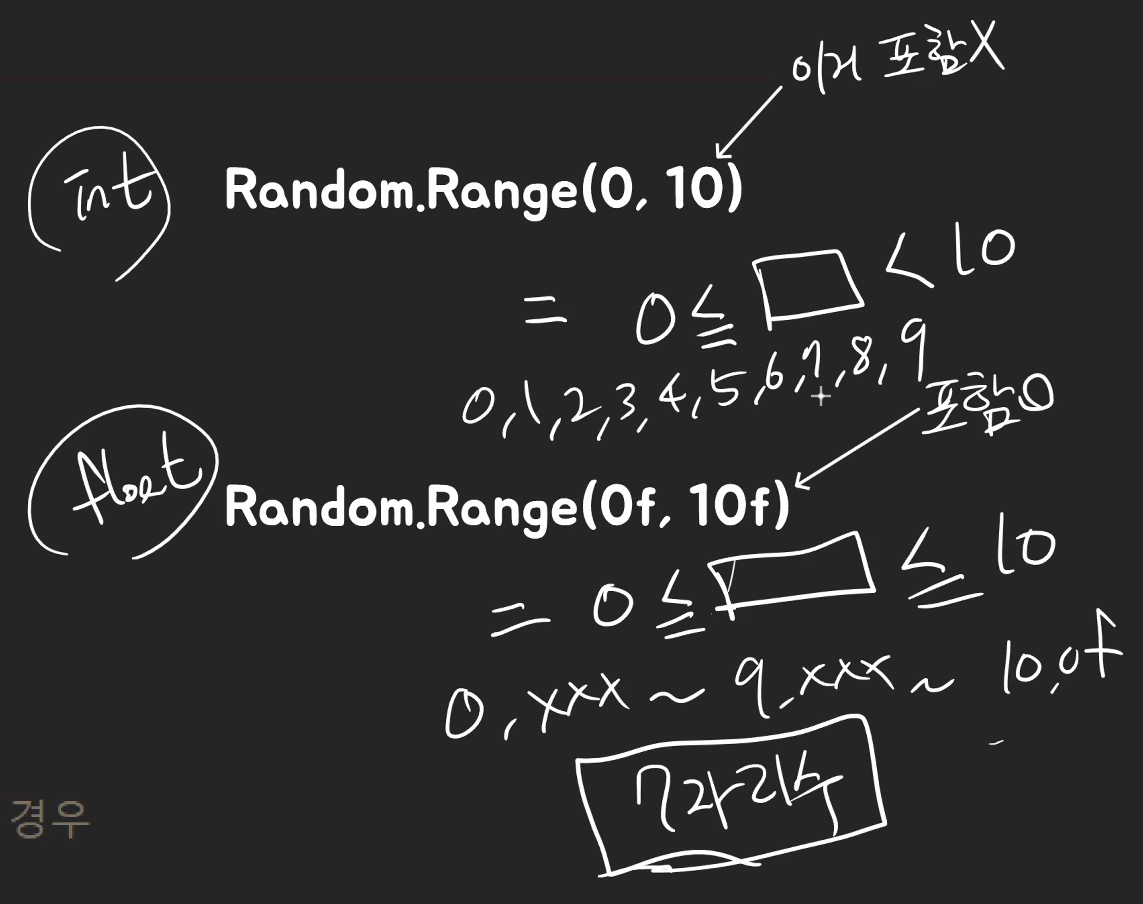
    void Start()
    {
        // 처음 시작할 때 파이프 타입을 설정
        int ranInt = Random.Range(0, 3); // 3가지(top, bottom, all) 0, 1, 2

// 중략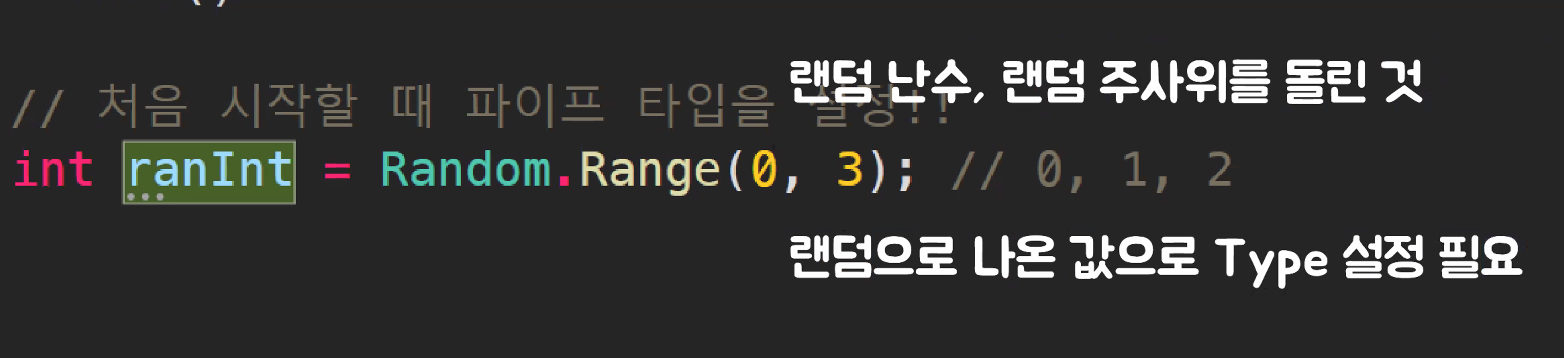
형변환 추가
        int ranInt = Random.Range(0, 3); // 3가지(top, bottom, all) 0, 1, 2
        pipeType = (PIPE_TYPE)ranInt; // 형변환 캐스팅
그럼 이제 랜덤으로 파이프가 생성됨(Pipe Group 3개 더 복제함)
함수 분리
using System.Collections;
using System.Collections.Generic;
using UnityEngine;

public class RandomPipeMap : MonoBehaviour
{
    public enum PIPE_TYPE { TOP, BOTTOM, ALL }
    public PIPE_TYPE pipeType;

    public GameObject[] pipes;
    public float pipeSpeed = 10f;

    void Start()
    {
        RandomPipeType(); // 처음 시작할 때 파이프 타입을 설정
    }

    void Update()
    {
        pipes[0].transform.position -= Vector3.right * pipeSpeed * Time.deltaTime;
        pipes[1].transform.position -= Vector3.right * pipeSpeed * Time.deltaTime;
    }

    private void RandomPipeType()
    {
        int ranInt = Random.Range(0, 3); // 3가지(top, bottom, all) 0, 1, 2
        pipeType = (PIPE_TYPE)ranInt; // 형변환 캐스팅


        if (pipeType == PIPE_TYPE.TOP)
        {
            pipes[0].SetActive(true);
            pipes[1].SetActive(false);
        }
        else if (pipeType == PIPE_TYPE.BOTTOM)
        {
            pipes[0].SetActive(false);
            pipes[1].SetActive(true);
        }
        else if (pipeType == PIPE_TYPE.ALL)
        {
            pipes[0].SetActive(true);
            pipes[1].SetActive(true);
        }
    }
}
파이프들이 특정 거리를 벗어나면 다시 가져오는(되돌려 보내는) 기능 필요
파이프의 위치가 화면을 벗어났을 때
따라서 아래처럼 조건문 작성
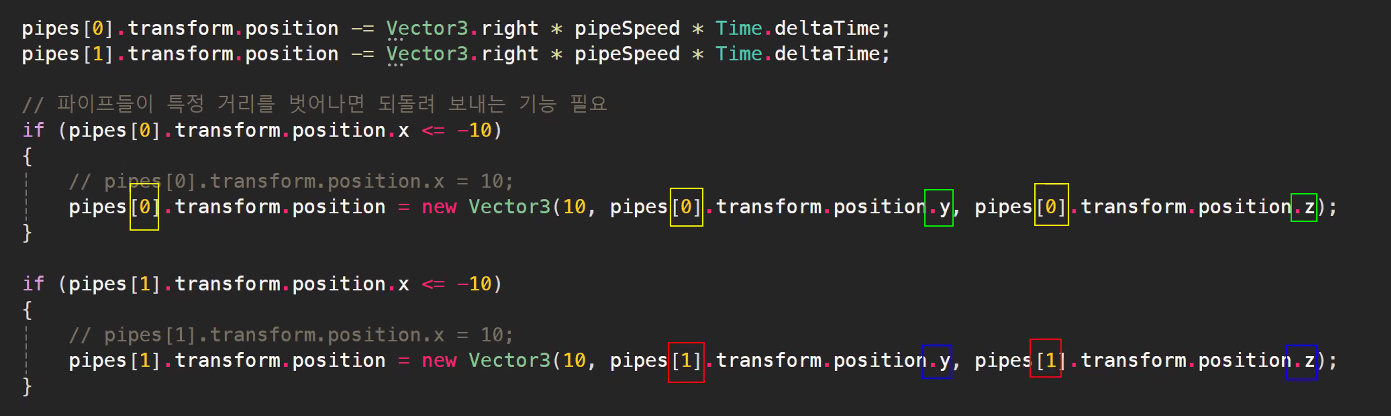
해당 코드에선 x축만 이동하고 y축, z축은 바꾸지 않았음

반복문
While
조건이 성립하는 동안 반복

using System.Collections;
using System.Collections.Generic;
using UnityEngine;

public class ExampleScript : MonoBehaviour
{
    public int count = 0;

    void Start()
    {
        WhileCount();
    }

    public void WhileCount()
    {
        while (count < 7)
        {
            Debug.Log("현재 count는 " + count);
            count++;

            if (count >= 3)
            {
                break;
            }
        }
    }
}
for 반복문
Start 값에서 Range 범위까지 순차적으로 반복
using System.Collections;
using System.Collections.Generic;
using UnityEngine;

public class ExampleScript : MonoBehaviour
{
    public int count = 10;

    void Start()
    {
        ForCount();
    }

    public void ForCount()
    {
        for (int i = 0; i < count; i++)
        {
            Debug.Log("현재 count는 " + i);
        }
    }
}
foreach 반복문
배열이나 리스트를 하나씩 반복
using System.Collections;
using System.Collections.Generic;
using UnityEngine;

public class ExampleScript : MonoBehaviour
{
    public string[] personNames = new string[3];

    void Start()
    {
        ForeachFindName();
    }

    public void ForeachFindName()
    {
        foreach (var personName in personNames)
        {
            Debug.Log("이름은 " + name);
        }
    }
}
반복문으로 리팩토링
using System.Collections;
using System.Collections.Generic;
using UnityEngine;

public class RandomPipeMap : MonoBehaviour
{
    public enum PIPE_TYPE { TOP, BOTTOM, ALL }
    public PIPE_TYPE pipeType;

    // public GameObject pipe;
    public GameObject[] pipes; // GameObject 배열
    public float pipeSpeed = 10f;

    void Start()
    {
        RandomPipeType(); // 처음 시작할 때 파이프 타입을 설정!!
    }

    void Update()
    {
        pipes[0].transform.position -= Vector3.right * pipeSpeed * Time.deltaTime;
        pipes[1].transform.position -= Vector3.right * pipeSpeed * Time.deltaTime;

        foreach (GameObject pipe in pipes)
        {
            pipe.transform.position -= Vector3.right * pipeSpeed * Time.deltaTime;

            if (pipe.transform.position.x <= -10f)
            {
                RandomPipeType();
                pipe.transform.position = new Vector3(10f, pipe.transform.position.y, pipe.transform.position.z);
            }
        }
    }

    private void RandomPipeType()
    {
        int ranInt = Random.Range(0, 3); // 0, 1, 2
        pipeType = (PIPE_TYPE)ranInt; // 형변환(캐스팅)

        if (pipeType == PIPE_TYPE.TOP) // 파이프 타입이 TOP일 경우
        {
            pipes[0].SetActive(true);
            pipes[1].SetActive(false);
        }
        else if (pipeType == PIPE_TYPE.BOTTOM) // 파이프 타입이 BOTTOM일 경우
        {
            pipes[0].SetActive(false);
            pipes[1].SetActive(true);
        }
        else if (pipeType == PIPE_TYPE.ALL) // 파이프 타입이 ALL일 경우
        {
            pipes[0].SetActive(true);
            pipes[1].SetActive(true);
        }
    }
}
높이 바꾸기
조건으로 걸기 위한 최대, 최소 높이 찾기

integer로 float보다 변화가 덜 다이나믹하기 때문에 float으로 랜덤값 진행
// RandomPipeMap.cs
// RandomPipeType()

		// 높이를 랜덤하게 배치하기
        float ranFloat = Random.Range(-3f, 3f); // float 타입의 랜덤 값

transform.position = new Vector3(transform.position.x, ranFloat, transform.position.z);하면 위아래 랜덤으로 잘 나옴
게임 사운드 적용
음악 넣고 들어보기

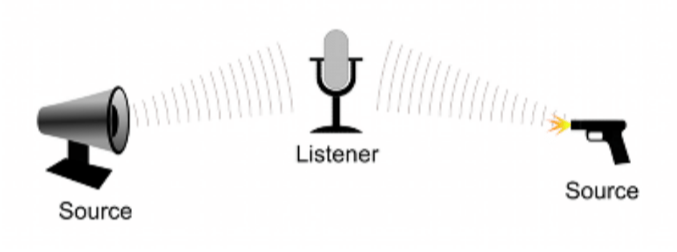
오디오 Audio
소리 재생, Scene에서 스피커 역할
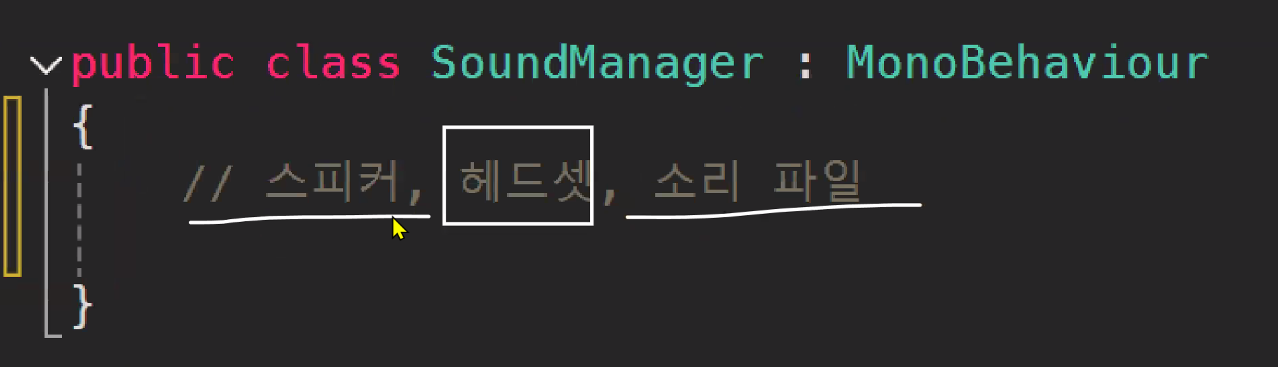
3요소 : 스피커, 헤드셋, 음원(소리 파일) 필요

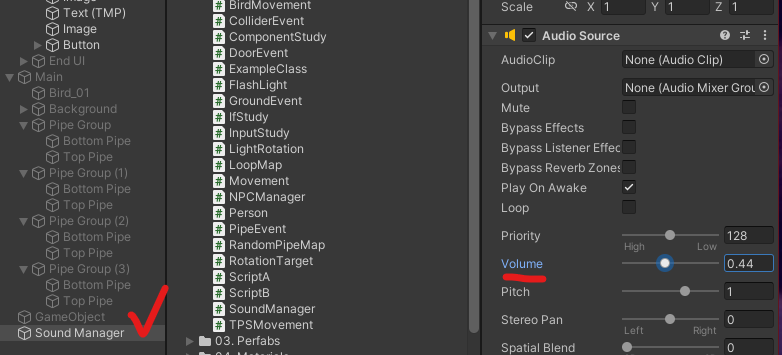
오디오 소스 생성

SoundManager.cs 스크립트 생성
스피커, 소리 파일만 설정해주면 됨
헤드셋은 카메라에 설정되어 있음
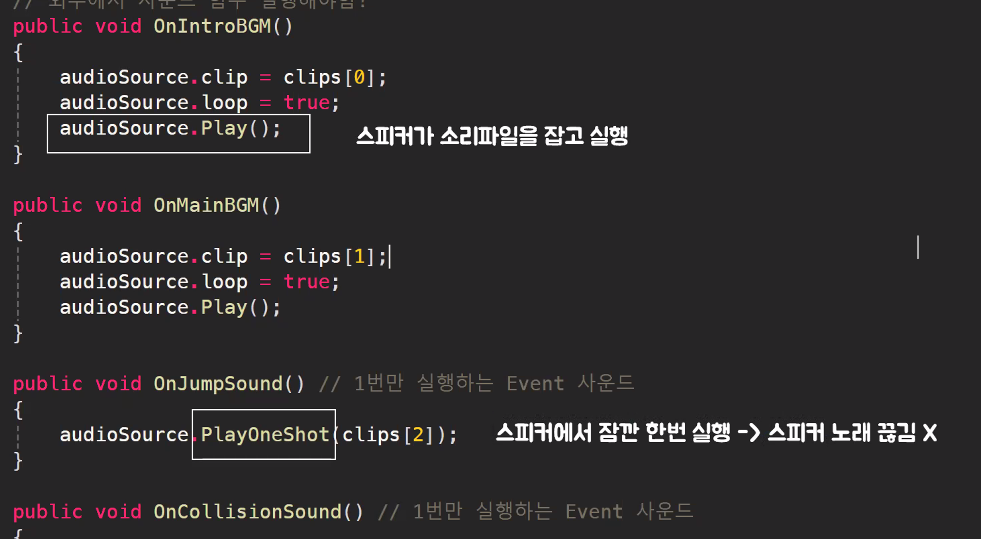
using System.Collections;
using System.Collections.Generic;
using UnityEngine;

public class SoundManager : MonoBehaviour
{
    private AudioSource audioSource; // 스피커
    public AudioClip[] clips; // 소리 파일 순서대로 넣을 예정

    void Start()
    {
        audioSource = GetComponent<AudioSource>();
        OnIntroBGM();
    }

    // 외부에서 사운드 함수 실행해야함
    public void OnIntroBGM()
    {
        audioSource.clip = clips[0];

        // BGM이니까 루프 실행, InspectorView에서 추가 가능
        audioSource.loop = true;

        audioSource.Play();
    }

    public void OnMainBGM()
    {
        audioSource.clip = clips[1];
        audioSource.loop = true;
        audioSource.Play();
    }

    public void OnJumpSound()
    {
        // 1번만 실행
        audioSource.PlayOneShot(clips[2]);
    }

    public void OnCollisionSound()
    {
        audioSource.PlayOneShot(clips[3]);
    }
}
Inspector View에서 Sound Manager(구 Audio Source) Object에
1. 스크립트 넣고
2. 소리 넣기

버튼 수정
버튼 누르면 메인 BGM 실행 되도록 OnMainBGM() 넣어주기
-> Intro랑 중복으로 나오는 거 아니야? : 스피커는 한개 뿐이라 .Play로 실행한 소리는 한번에 하나 재생됨


볼륨 조절
새가 점프할 때 소리 넣기
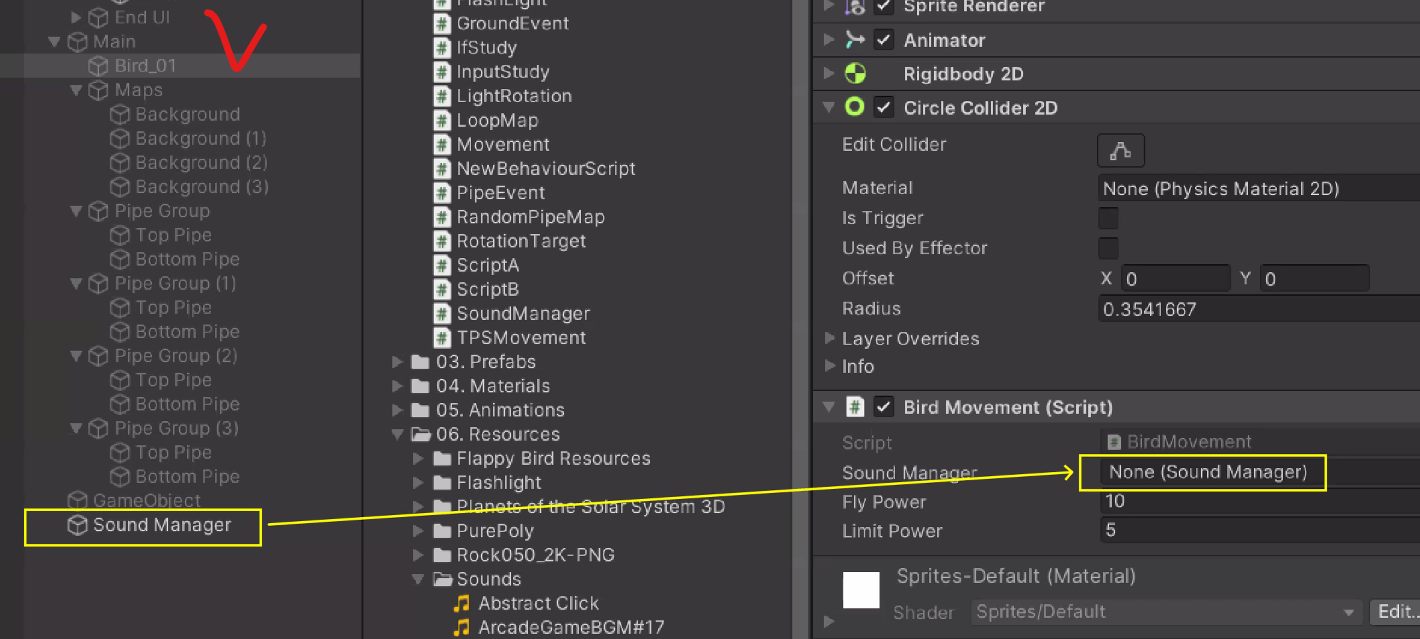
새가 점프할 때(BirdMovement.cs) 위에 만든 SoundManager class에서 OnJumpSound() 호출
실제로는 싱글톤 패턴 등을 사용함

Inspector에서 넣어주기
Pipe에 부딪혔을 때 Sound 넣어주기(위와 동일)


결과물
난이도 헬ㅋㅋㅋ
코루틴 Coroutine
Co = Together (ex. Coworker)
유니티의 Awake() Start() Update() 같은 메인 루틴과 다른 서브 루틴 개념
StartCoroutine("이름");으로 시작, StopCouroutine으로 종료
WaitForSeconds 등을 사용해 대기시킬 수도 있음
Start문 등 한번 실행되는 함수에서 사용함(당연함. 루틴임.)


하도 Start에서 많이 써서 IEnumerator(코루틴 타입) 붙이고 Start 쓰면 유니티에서 코루틴으로 인식함
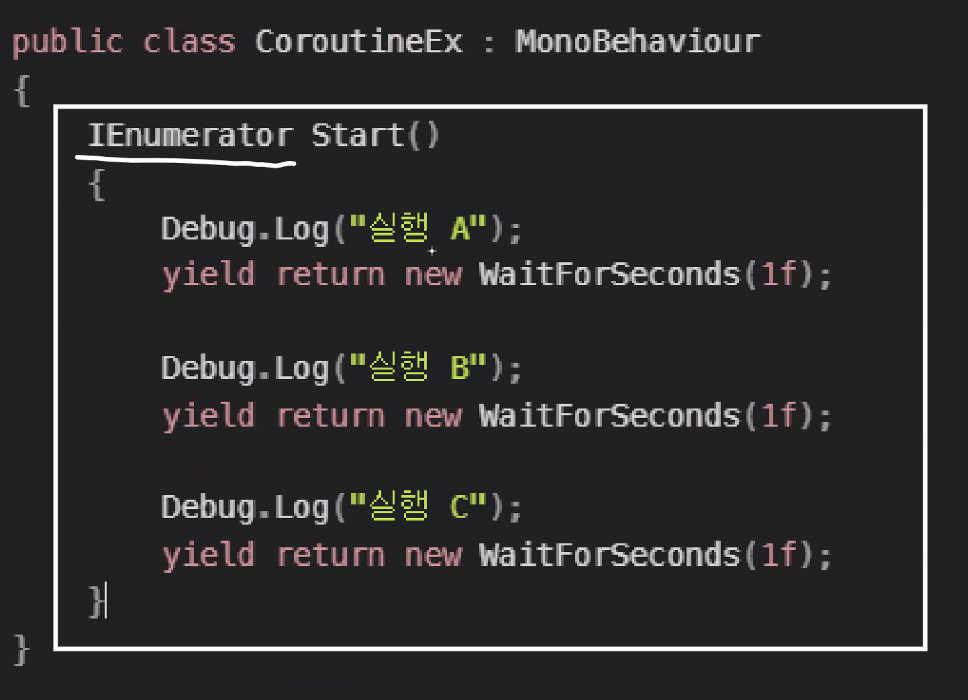
Start 구문에서 호출할 땐 아래처럼 두가지 방법으로 할 수 있음

폭탄 시간 재는 타이머 같은 경우
1초에 한번만 실행되면 되는데 Update()에서는 불가능함
그럴 때 코루틴 활용하여 해결 가능
1초마다 대기 시켜서(WaitForSeconds(1f)) 쓰면 결과적으로 1초마다 실행됨

return이나 break를 yield를 붙인 yield return, yield break 등을 사용함

사담
폰게임 만들 때 나라별로 많이 쓰는 기종이 달라서 해당 기종으로 테스트 해야 한다는 사실을 새롭게 깨달았다
오...그렇겠구나...
반복문에 대한 쉽고 자세한 설명을 듣고 있으니 처음 코딩 배울 때가 생각났다
오늘 엄청 숨가쁘게 진행했는데 하고나니 게임이 뚝딱~ 오~~~
강사님 쉬는시간, 점심시간에도 제대로 못쉬시고 오늘은 6시까지 풀강 달리셨다
정말 혼자 계속 말하기만해도 힘드실텐데 존경심이 절로 든다;
'공부 > Game Bootcamp' 카테고리의 다른 글
| [멋쟁이사자처럼 부트캠프 TIL] 유니티 게임 개발 3기 : 자료구조(LinkedList) (1) | 2024.12.03 |
|---|---|
| [멋쟁이사자처럼 부트캠프 TIL] 유니티 게임 개발 3기 : 라이더 설치, 자료구조 (2) | 2024.12.02 |
| [멋쟁이사자처럼 부트캠프 TIL] 유니티 게임 개발 3기 : Animation, Light, UI - Text 등 (0) | 2024.11.28 |
| [멋쟁이사자처럼 부트캠프 TIL] 유니티 게임 개발 3기 : Animator, Rigidbody 등 (1) | 2024.11.27 |
| [멋쟁이사자처럼 부트캠프 TIL] 유니티 게임 개발 3기 : 캐릭터 만들기 + Unity C# 기초 문법(연산자, 조건문) (0) | 2024.11.22 |
어제에 이어서 Flappy Bird 만들기
Button 만들기
빈 게임 오브젝트 만들어서 화면 채우기
UI를 묶어주기
Button 누르면 화면 꺼지도록 OnClick()에 Intro UI / GameObject - SetActive 설정
결과물
GameView 화면
버튼 클릭 시 Canvas의 Intro UI가 잘 사라지는 모습(Active = false)
2D 이미지로 Animation 생성
Animation으로 만들 이미지 선택 후 drag&drop
2D 게임을 위한 원근감 없는 카메라로 변경
배경 이미지 복제
Order in Layer
새의 Order in Layer를 1로 바꿔주면 배경 이미지에 가려져있던 게 보임
-1, 0, 1, 2 ~ <- 이런 순서
무한맵(맵 반복)
새가 앞으로 가는 것처럼 무한맵 만들기
1. 지나간 이미지 재사용 : 이미 지나간 이미지를 다시 뒤로 배치
2. Material 수정 : Offset 수정
스크립트 작성
int, float, bool, string 등은 이미 초기값이 있어서 private으로 생성할 때 초기화 안해줘도 됨
하지만 아래처럼 유니티 상에서 None으로 할당해줘야할 땐 초기화 필요
    private SpriteRenderer sp;

        void Start()
    {
        sp = GetComponent<SpriteRenderer>(); // 할당
    }
offset 변경
// LoopMap.cs

using System.Collections;
using System.Collections.Generic;
using UnityEngine;

public class LoopMap : MonoBehaviour
{
    private SpriteRenderer sp;
    public float offsetSpeed = 0.5f;

    void Start()
    {
        sp = GetComponent<SpriteRenderer>();
    }

    void Update()
    {
        float offsetVal = offsetSpeed * Time.deltaTime;
        sp.material.SetTextureOffset("_MainTex", sp.material.mainTextureOffset + new Vector2(offsetVal, 0f));
    }
}
아래 값을 바꾸려고 하는것을 알 수 있음
근데 이건 유니티에서 기본으로 생성한 Default라 못바꿈
새로운 Material 생성
Shader 수정
Material에 배경 이미지 할당
배경 이미지 1234에 방금 만든 Material 할당
LoopMap 스크립트 할당
결과물
배경이 움직이는 것을 확인 가능
Bird 01에 Rigidbody 2D 넣기
이제 새가 떨어짐
새가 스페이스바 눌렀을 때 위로 날아오르는 기능(점프 기능) 제작
스크립트 생성
// BirdMovement.cs

using System.Collections;
using System.Collections.Generic;
using UnityEngine;

public class BirdMovement : MonoBehaviour
{
    private Rigidbody2D myRigid;
    public float flyPower = 10f;

    void Start()
    {
        myRigid = GetComponent<Rigidbody2D>(); // 자기 자신의 Rigidbody2D를 할당
    }

    /// 키보드 스페이스바를 눌러서
    /// 새가 날아오르는 기능
    void Update()
    {
        if (Input.GetKeyDown(KeyCode.Space)) // 스페이스바 눌렀을 때
        {
            myRigid.AddForce(Vector2.up * flyPower, ForceMode2D.Impulse); // 위쪽으로 힘을 가함
        }
    }
}
Bird에 스크립트 적용
결과물
스페이스바 연타하면 엄청 멀리감ㅋㅋ달로 떠난 Flappy Bird ver.
힘 Force는 속도 velocity에 영향을 주기 때문에 속도 제한 limit velocity이 필요
스크립트 수정
속도 제한은 위쪽으로 힘을 가한 다음에 해야함
using System.Collections;
using System.Collections.Generic;
using UnityEngine;

public class BirdMovement : MonoBehaviour
{
    private Rigidbody2D myRigid;
    public float flyPower = 10f;
    public float limitPower = 5f;

    void Start()
    {
        myRigid = GetComponent<Rigidbody2D>(); // 자기 자신의 Rigidbody2D를 할당
    }

    /// 키보드 스페이스바를 눌러서
    /// 새가 날아오르는 기능
    void Update()
    {
        if (Input.GetKeyDown(KeyCode.Space))
        {
            myRigid.AddForce(Vector2.up * flyPower, ForceMode2D.Impulse);

            // 속도 체크 및 제한
            if (myRigid.velocity.y > limitPower) // 새의 y축 속도가 제한 속도보다 커졌을 때
            {
                // 속도 재조정
                myRigid.velocity = new Vector2(myRigid.velocity.x, limitPower);
            }
        }
    }
}
결과물
파이프 생성
pipe 넣고
스크립트 생성
pipe(GameObject)의 transform의 position이 3차원이라 Vector3 반영
// RandomPipeMap.cs

using System.Collections;
using System.Collections.Generic;
using UnityEngine;

public class RandomPipeMap : MonoBehaviour
{
    public GameObject pipe;
    public float pipeSpeed = 10f;

    void Update()
    {
        //pipe.transform.position = pipe.transform.position - Vector3.right * pipeSpeed * Time.deltaTime;
        pipe.transform.position -= Vector3.right * pipeSpeed * Time.deltaTime;
    }
}
-Vector3.right = Vector3.left
스크립트 할당
결과물
파이프가 잘 지나감
아직 파이프랑 충돌 이벤트는 없지만...한번 피해봄
파이프에 닿으면 게임 오버
이번엔 감지로 구현
스크립트 작성
OnTriggerEnter2D : Rigidbody2D, Collider2D에만 작동
using System.Collections;
using System.Collections.Generic;
using UnityEngine;

public class PipeEvent : MonoBehaviour
{
    public void OnTriggerEnter2D(Collider2D collision)
    {
        if (collision.CompareTag("Player"))
        {
            Debug.Log("GameOver");
        }
    }
}
태그 설정
이제 Bird와 Pipe에 각각 Collider2D 필요
Circle Collider 2D : 2D에서 가장 최적화 된 콜라이더
3D에선 Box Collider가 가장 최적화 된 콜라이더
Bird에 Circle Collider 2D
Pipe에 Box Collider 2D 각각 넣기
Pipe에는 감지 이벤트를 위해 isTrigger까지 체크
로그 확인 가능
Game over 화면 구현
Image UI object 생성
배경 만들기
화면 꽉 채우고
불투명도 0, 검정색(0, 0, 0, 0)으로 변경
Game Over 이미지 넣기
Main UI에 애니메이션 생성
60 프레임에 불투명도 255로 조절
글자 팝업 애니메이션
Scale 0 -> 2
현재 상태
애니메이션 수정
먼저 fade in 되고나서 GameOver 문구 팝업
루프 끄기
스크립트 수정
// PipeEvent.cs

using System.Collections;
using System.Collections.Generic;
using UnityEngine;

public class PipeEvent : MonoBehaviour
{
    public GameObject endUI;
    public void OnTriggerEnter2D(Collider2D collision)
    {
        if (collision.CompareTag("Player"))
        {
            endUI.SetActive(true); // 종료 UI가 켜지는 기능

            Debug.Log("GameOver");
        }
    }
}
End UI로 이름 바꾼 Main UI 할당 및 Active false로 해두기
이제 부딪히면 GameOver 잘 뜸
Main이라는 Empty GameObject 만들어서 UI 제외한 object들 그룹화
Game Start 버튼 누르면 게임이 실행되도록 수정
-> 버튼 누르면 main의 active = true
결과물
게임 시작 버튼 눌러야 시작 완료
배열
Array
공간 추가, 삭제 불가능 ex. 아파트 = 속도 빠름
    public int[] intArr = {  1, 2, 3, 4, 5 };
    public float[] floatArr; // 유니티 에디터 상에서 할당 필요
    public GameObject[] gameObjArr = new GameObject[3]; // 요소 수가 3인 GameObject 배열 생성
유니티 에디터 상에서 확인 가능
List
Array와 다르게 공간 추가, 삭제 가능 = 속도 느림
linked list
Unity에서는 list가 동적 Array임
= 수정이 가능한 Array(약 2배정도 공간을 더 할당해서 추가 가능)
= ArrayList
    public List<int> intList = new List<int> { 1, 2, 3, 4, 5 };
    public List<float> floatList;
    public List<GameObject> gameObjList = new List<GameObject>();
유니티 에디터에서 확인 가능
유니티 에디터에서 Array도 수정 기능 지원함
인덱서 Indexer
public class ExampleClass : MonoBehaviour
{
    public int[] array1 = { 1, 2, 3, 4, 5 };
    public float[] array2 = { 1.0f, 5.5f, -15f };
    public int[] array3 = new int[7];

    public List<int> list1 = new List<int> { 1, 2, 3, 4, 5 };
    public List<float> list2 = new List<float> { 1.0f, 5.5f, -15f };

    void Start()
    {
        Debug.Log(array1[0]);
        Debug.Log(array2[1]);
        Debug.Log(array2[7]); // 에러 발생

        Debug.Log(list1[1]);
        Debug.Log(list2[2]);
    }
}
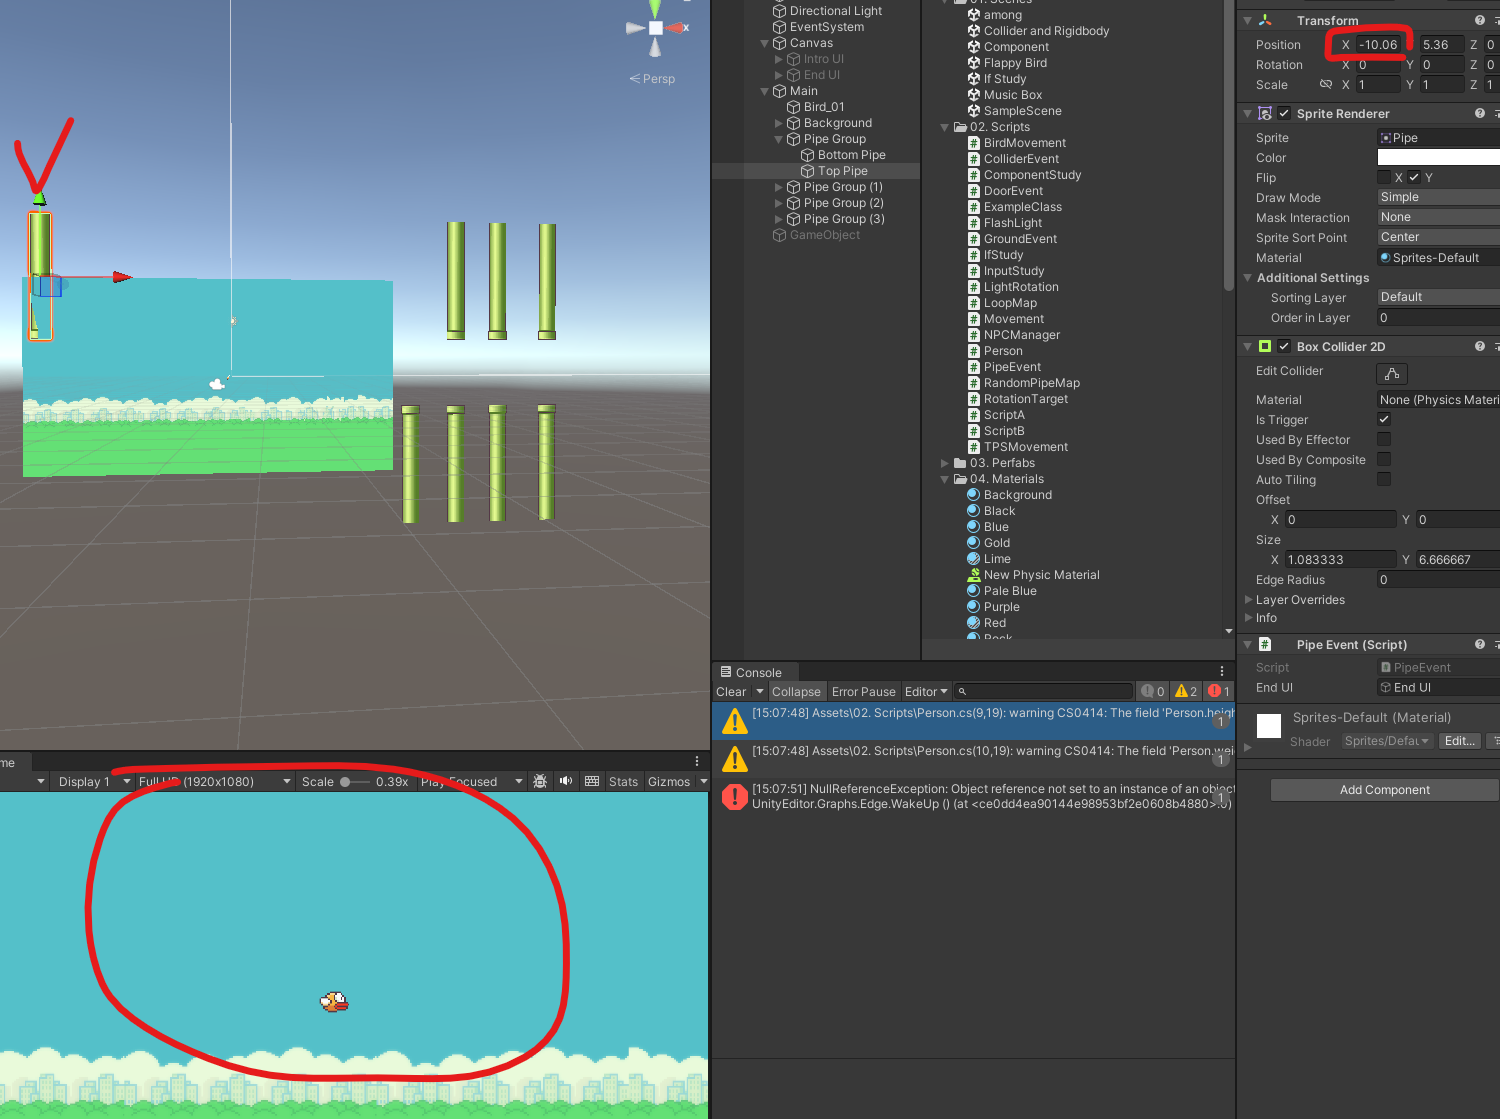
파이프 랜덤 생성
파이프 적절하게 배치
위에 있는 파이프는 Flip으로 뒤집기
빈게임오브젝트 'Pipe Group' 생성하여 pipe들 그룹화
RandomPipeMap Script Pipe Group에 넣어주기
using System.Collections;
using System.Collections.Generic;
using UnityEngine;

public class RandomPipeMap : MonoBehaviour
{
    public GameObject[] pipes;
    public float pipeSpeed = 10f;

    void Update()
    {
        pipes[0].transform.position -= Vector3.right * pipeSpeed * Time.deltaTime;
        pipes[1].transform.position -= Vector3.right * pipeSpeed * Time.deltaTime;
    }
}
Top, Bottom Pipe 할당
파이프는 위, 아래도 랜덤하게 생성해야 함
=> enum 사용
    public enum PIPE_TYPE { TOP, BOTTOM, ALL }
    public PIPE_TYPE pipeType;
랜덤은 같은 타입만 넣을 수 있음
Random.Range(int, int)
Random.Range(float, float)
void Start()
{
// 처음 시작할 때 파이프 타입을 설정
int ranInt = Random.Range(0, 3); // 3가지(top, bottom, all) 0, 1, 2
// 중략
형변환 추가
        int ranInt = Random.Range(0, 3); // 3가지(top, bottom, all) 0, 1, 2
        pipeType = (PIPE_TYPE)ranInt; // 형변환 캐스팅
그럼 이제 랜덤으로 파이프가 생성됨(Pipe Group 3개 더 복제함)
함수 분리
using System.Collections;
using System.Collections.Generic;
using UnityEngine;

public class RandomPipeMap : MonoBehaviour
{
    public enum PIPE_TYPE { TOP, BOTTOM, ALL }
    public PIPE_TYPE pipeType;

    public GameObject[] pipes;
    public float pipeSpeed = 10f;

    void Start()
    {
        RandomPipeType(); // 처음 시작할 때 파이프 타입을 설정
    }

    void Update()
    {
        pipes[0].transform.position -= Vector3.right * pipeSpeed * Time.deltaTime;
        pipes[1].transform.position -= Vector3.right * pipeSpeed * Time.deltaTime;
    }

    private void RandomPipeType()
    {
        int ranInt = Random.Range(0, 3); // 3가지(top, bottom, all) 0, 1, 2
        pipeType = (PIPE_TYPE)ranInt; // 형변환 캐스팅


        if (pipeType == PIPE_TYPE.TOP)
        {
            pipes[0].SetActive(true);
            pipes[1].SetActive(false);
        }
        else if (pipeType == PIPE_TYPE.BOTTOM)
        {
            pipes[0].SetActive(false);
            pipes[1].SetActive(true);
        }
        else if (pipeType == PIPE_TYPE.ALL)
        {
            pipes[0].SetActive(true);
            pipes[1].SetActive(true);
        }
    }
}
파이프들이 특정 거리를 벗어나면 다시 가져오는(되돌려 보내는) 기능 필요
파이프의 위치가 화면을 벗어났을 때
따라서 아래처럼 조건문 작성
해당 코드에선 x축만 이동하고 y축, z축은 바꾸지 않았음
반복문
While
조건이 성립하는 동안 반복
using System.Collections;
using System.Collections.Generic;
using UnityEngine;

public class ExampleScript : MonoBehaviour
{
    public int count = 0;

    void Start()
    {
        WhileCount();
    }

    public void WhileCount()
    {
        while (count < 7)
        {
            Debug.Log("현재 count는 " + count);
            count++;

            if (count >= 3)
            {
                break;
            }
        }
    }
}
for 반복문
Start 값에서 Range 범위까지 순차적으로 반복
using System.Collections;
using System.Collections.Generic;
using UnityEngine;

public class ExampleScript : MonoBehaviour
{
    public int count = 10;

    void Start()
    {
        ForCount();
    }

    public void ForCount()
    {
        for (int i = 0; i < count; i++)
        {
            Debug.Log("현재 count는 " + i);
        }
    }
}
foreach 반복문
배열이나 리스트를 하나씩 반복
using System.Collections;
using System.Collections.Generic;
using UnityEngine;

public class ExampleScript : MonoBehaviour
{
    public string[] personNames = new string[3];

    void Start()
    {
        ForeachFindName();
    }

    public void ForeachFindName()
    {
        foreach (var personName in personNames)
        {
            Debug.Log("이름은 " + name);
        }
    }
}
반복문으로 리팩토링
using System.Collections;
using System.Collections.Generic;
using UnityEngine;

public class RandomPipeMap : MonoBehaviour
{
    public enum PIPE_TYPE { TOP, BOTTOM, ALL }
    public PIPE_TYPE pipeType;

    // public GameObject pipe;
    public GameObject[] pipes; // GameObject 배열
    public float pipeSpeed = 10f;

    void Start()
    {
        RandomPipeType(); // 처음 시작할 때 파이프 타입을 설정!!
    }

    void Update()
    {
        pipes[0].transform.position -= Vector3.right * pipeSpeed * Time.deltaTime;
        pipes[1].transform.position -= Vector3.right * pipeSpeed * Time.deltaTime;

        foreach (GameObject pipe in pipes)
        {
            pipe.transform.position -= Vector3.right * pipeSpeed * Time.deltaTime;

            if (pipe.transform.position.x <= -10f)
            {
                RandomPipeType();
                pipe.transform.position = new Vector3(10f, pipe.transform.position.y, pipe.transform.position.z);
            }
        }
    }

    private void RandomPipeType()
    {
        int ranInt = Random.Range(0, 3); // 0, 1, 2
        pipeType = (PIPE_TYPE)ranInt; // 형변환(캐스팅)

        if (pipeType == PIPE_TYPE.TOP) // 파이프 타입이 TOP일 경우
        {
            pipes[0].SetActive(true);
            pipes[1].SetActive(false);
        }
        else if (pipeType == PIPE_TYPE.BOTTOM) // 파이프 타입이 BOTTOM일 경우
        {
            pipes[0].SetActive(false);
            pipes[1].SetActive(true);
        }
        else if (pipeType == PIPE_TYPE.ALL) // 파이프 타입이 ALL일 경우
        {
            pipes[0].SetActive(true);
            pipes[1].SetActive(true);
        }
    }
}
높이 바꾸기
조건으로 걸기 위한 최대, 최소 높이 찾기
integer로 float보다 변화가 덜 다이나믹하기 때문에 float으로 랜덤값 진행
// RandomPipeMap.cs
// RandomPipeType()

		// 높이를 랜덤하게 배치하기
        float ranFloat = Random.Range(-3f, 3f); // float 타입의 랜덤 값

        transform.position = new Vector3(transform.position.x, ranFloat, transform.position.z);
하면 위아래 랜덤으로 잘 나옴
게임 사운드 적용
음악 넣고 들어보기
오디오 Audio
소리 재생, Scene에서 스피커 역할
3요소 : 스피커, 헤드셋, 음원(소리 파일) 필요
오디오 소스 생성
SoundManager.cs 스크립트 생성
스피커, 소리 파일만 설정해주면 됨
헤드셋은 카메라에 설정되어 있음
using System.Collections;
using System.Collections.Generic;
using UnityEngine;

public class SoundManager : MonoBehaviour
{
    private AudioSource audioSource; // 스피커
    public AudioClip[] clips; // 소리 파일 순서대로 넣을 예정

    void Start()
    {
        audioSource = GetComponent<AudioSource>();
        OnIntroBGM();
    }

    // 외부에서 사운드 함수 실행해야함
    public void OnIntroBGM()
    {
        audioSource.clip = clips[0];

        // BGM이니까 루프 실행, InspectorView에서 추가 가능
        audioSource.loop = true;

        audioSource.Play();
    }

    public void OnMainBGM()
    {
        audioSource.clip = clips[1];
        audioSource.loop = true;
        audioSource.Play();
    }

    public void OnJumpSound()
    {
        // 1번만 실행
        audioSource.PlayOneShot(clips[2]);
    }

    public void OnCollisionSound()
    {
        audioSource.PlayOneShot(clips[3]);
    }
}
Inspector View에서 Sound Manager(구 Audio Source) Object에
1. 스크립트 넣고
2. 소리 넣기
버튼 수정
버튼 누르면 메인 BGM 실행 되도록 OnMainBGM() 넣어주기
-> Intro랑 중복으로 나오는 거 아니야? : 스피커는 한개 뿐이라 .Play로 실행한 소리는 한번에 하나 재생됨
볼륨 조절
새가 점프할 때 소리 넣기
새가 점프할 때(BirdMovement.cs) 위에 만든 SoundManager class에서 OnJumpSound() 호출
실제로는 싱글톤 패턴 등을 사용함
Inspector에서 넣어주기
Pipe에 부딪혔을 때 Sound 넣어주기(위와 동일)
결과물
난이도 헬ㅋㅋㅋ
코루틴 Coroutine
Co = Together (ex. Coworker)
유니티의 Awake() Start() Update() 같은 메인 루틴과 다른 서브 루틴 개념
StartCoroutine("이름");으로 시작, StopCouroutine으로 종료
WaitForSeconds 등을 사용해 대기시킬 수도 있음
Start문 등 한번 실행되는 함수에서 사용함(당연함. 루틴임.)
하도 Start에서 많이 써서 IEnumerator(코루틴 타입) 붙이고 Start 쓰면 유니티에서 코루틴으로 인식함
Start 구문에서 호출할 땐 아래처럼 두가지 방법으로 할 수 있음
폭탄 시간 재는 타이머 같은 경우
1초에 한번만 실행되면 되는데 Update()에서는 불가능함
그럴 때 코루틴 활용하여 해결 가능
1초마다 대기 시켜서(WaitForSeconds(1f)) 쓰면 결과적으로 1초마다 실행됨
return이나 break를 yield를 붙인 yield return, yield break 등을 사용함
사담
폰게임 만들 때 나라별로 많이 쓰는 기종이 달라서 해당 기종으로 테스트 해야 한다는 사실을 새롭게 깨달았다
오...그렇겠구나...
반복문에 대한 쉽고 자세한 설명을 듣고 있으니 처음 코딩 배울 때가 생각났다
오늘 엄청 숨가쁘게 진행했는데 하고나니 게임이 뚝딱~ 오~~~
강사님 쉬는시간, 점심시간에도 제대로 못쉬시고 오늘은 6시까지 풀강 달리셨다
정말 혼자 계속 말하기만해도 힘드실텐데 존경심이 절로 든다;
'공부 > Game Bootcamp' 카테고리의 다른 글
| [멋쟁이사자처럼 부트캠프 TIL] 유니티 게임 개발 3기 : 자료구조(LinkedList) (1) | 2024.12.03 |
|---|---|
| [멋쟁이사자처럼 부트캠프 TIL] 유니티 게임 개발 3기 : 라이더 설치, 자료구조 (2) | 2024.12.02 |
| [멋쟁이사자처럼 부트캠프 TIL] 유니티 게임 개발 3기 : Animation, Light, UI - Text 등 (0) | 2024.11.28 |
| [멋쟁이사자처럼 부트캠프 TIL] 유니티 게임 개발 3기 : Animator, Rigidbody 등 (1) | 2024.11.27 |
| [멋쟁이사자처럼 부트캠프 TIL] 유니티 게임 개발 3기 : 캐릭터 만들기 + Unity C# 기초 문법(연산자, 조건문) (0) | 2024.11.22 |